If we have a better understanding of what Bluemix can offer, we can walk through the process of provisioning our first runtime and services. And see how we can get started coding and building out our app using the DevOps Services. For this module, we will need to have signed up for your Bluemix account, and a free DevOps Services account.
Provision Node.js Runtime
To get started provisioning our first runtime, log into your Bluemix dashboard;
Once logged in, you can click Create App under the Compute Category.
Simply go to add New Service;
Select Web when prompted, and from here you will be presented with the runtimes available. We want to selected SDK for Node.js and click Continue when prompted;
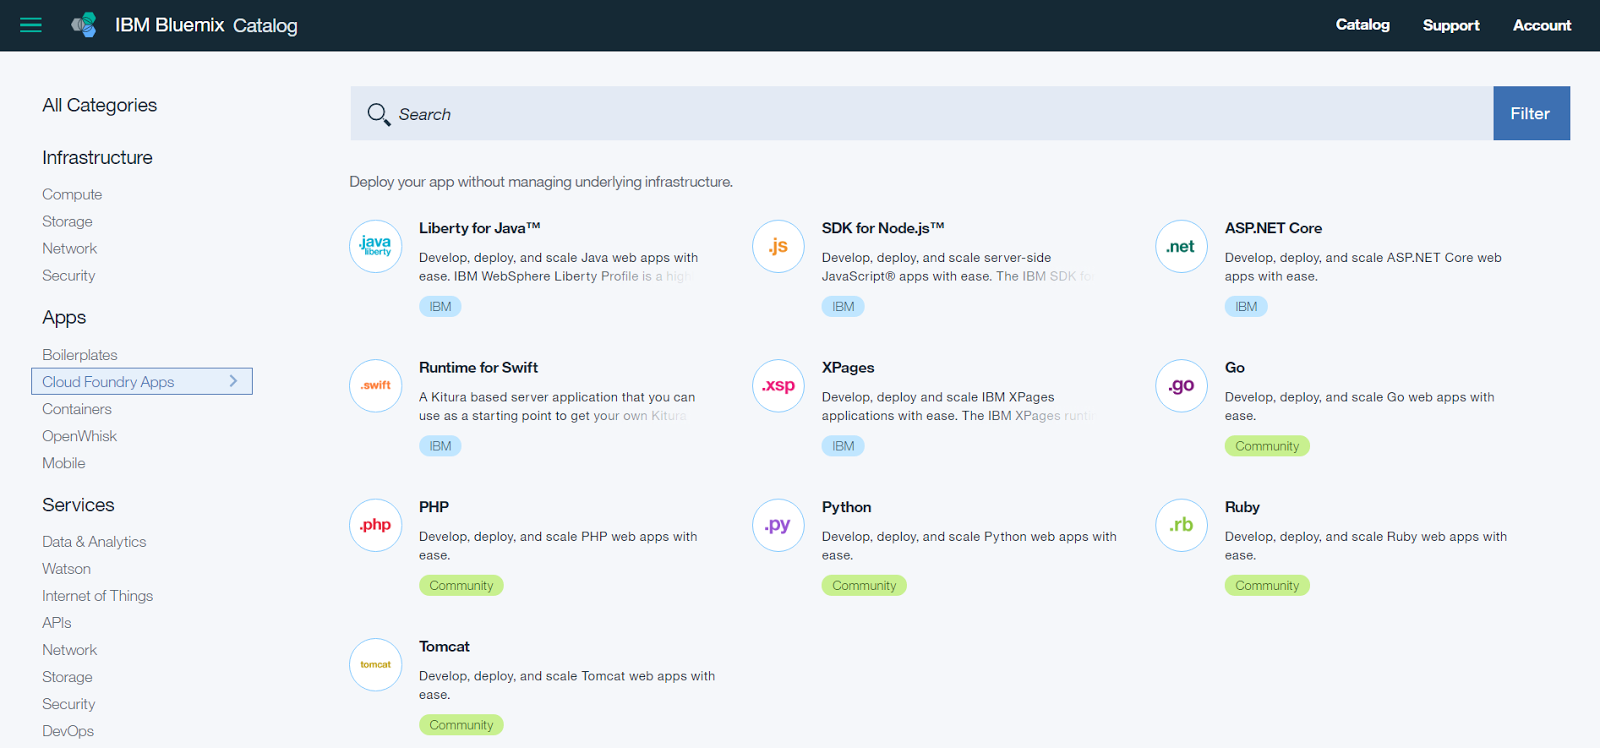
For our app name we are using Insights App and click finish.
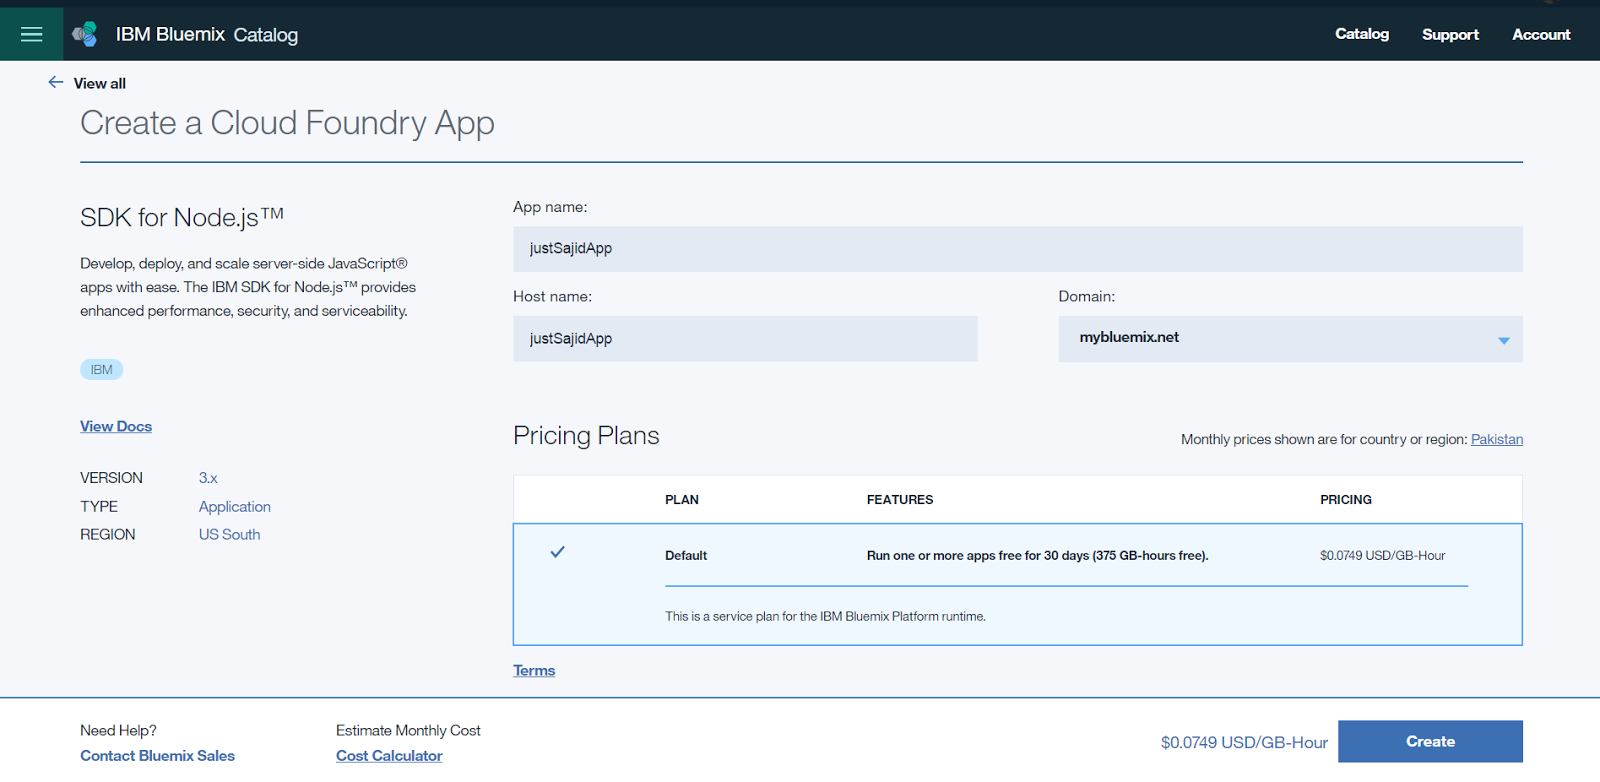
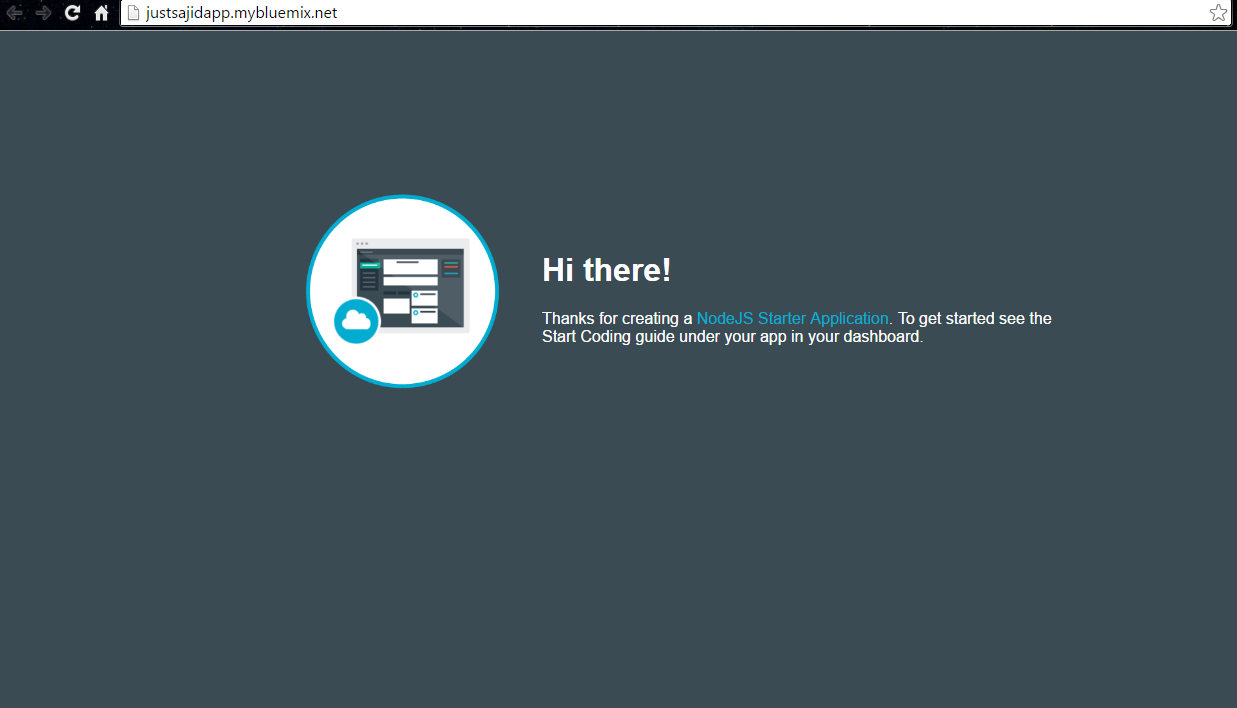
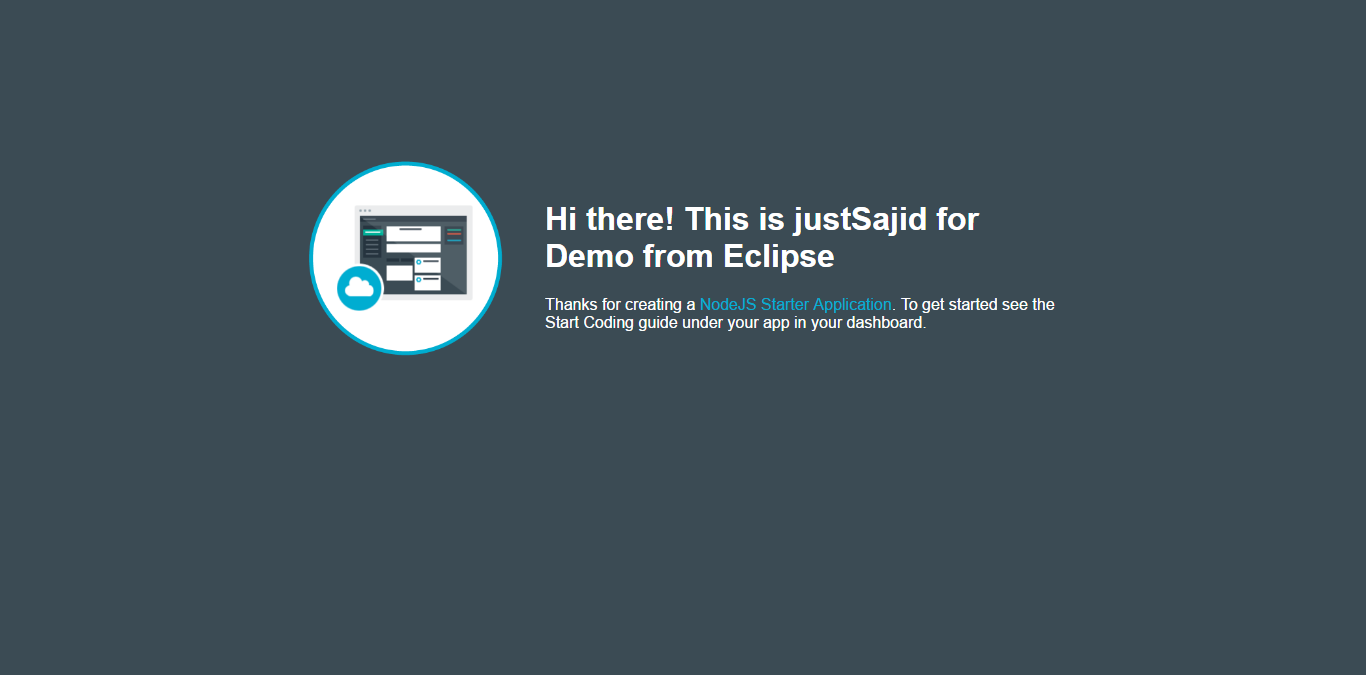
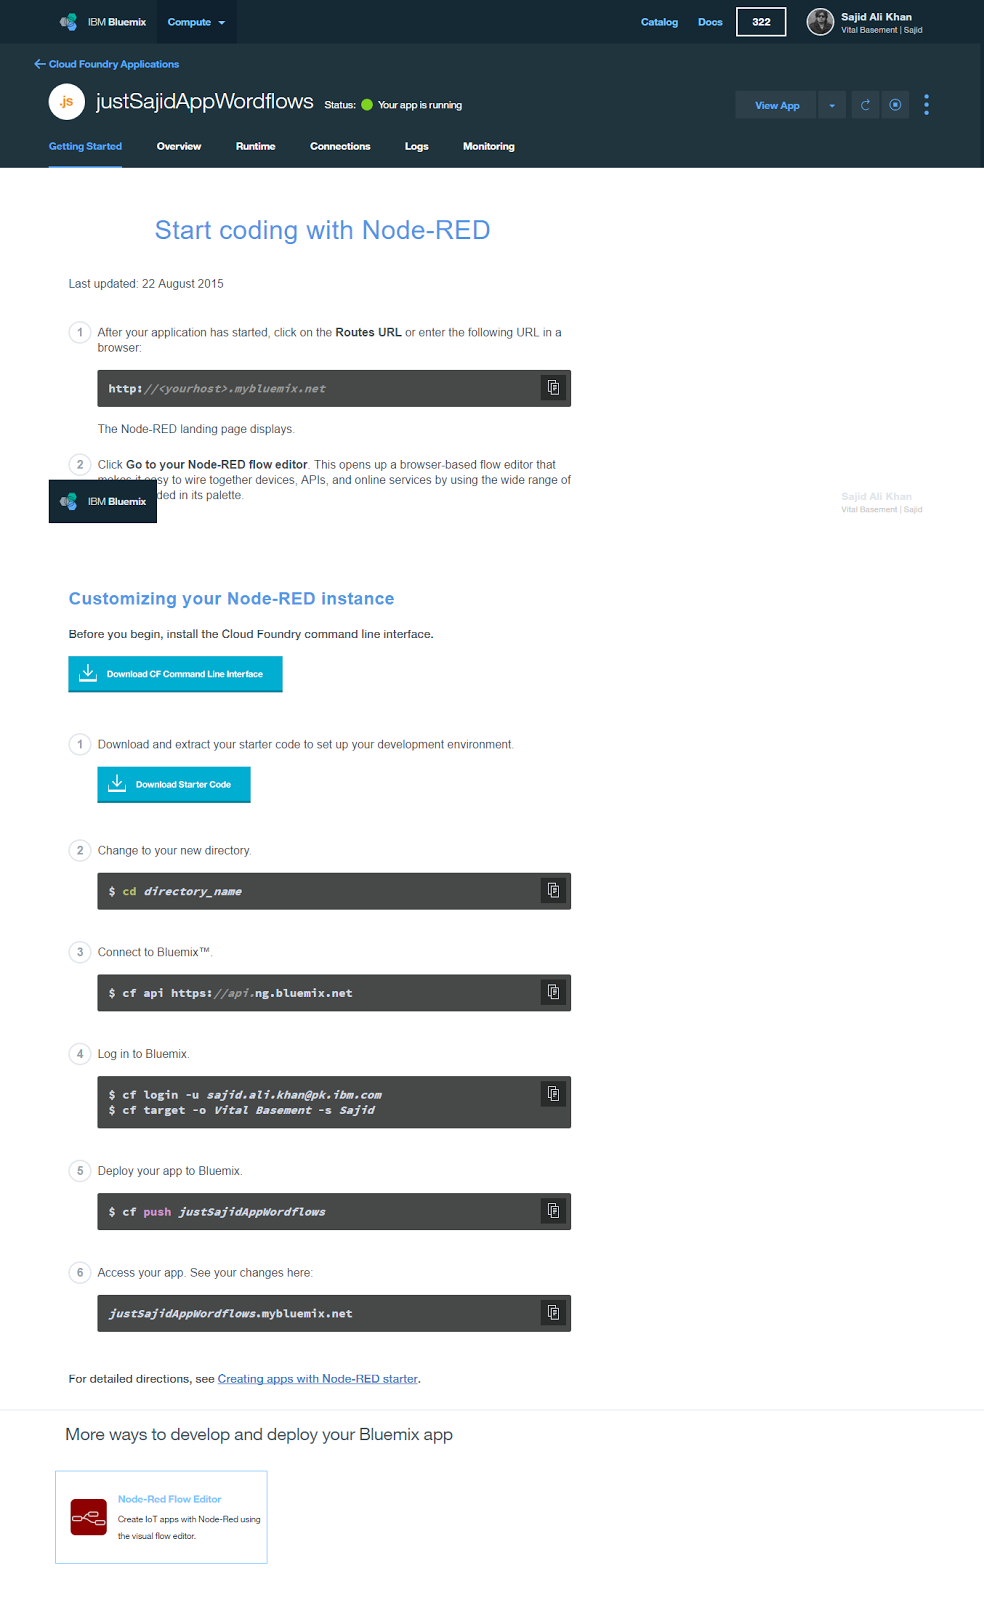
Bluemix will now run through the process of staging our application. Staging is now complete and our app is running under the host name provided. We can click on the host name and you will see we’re presented with the holding page for our Node.js starter application;
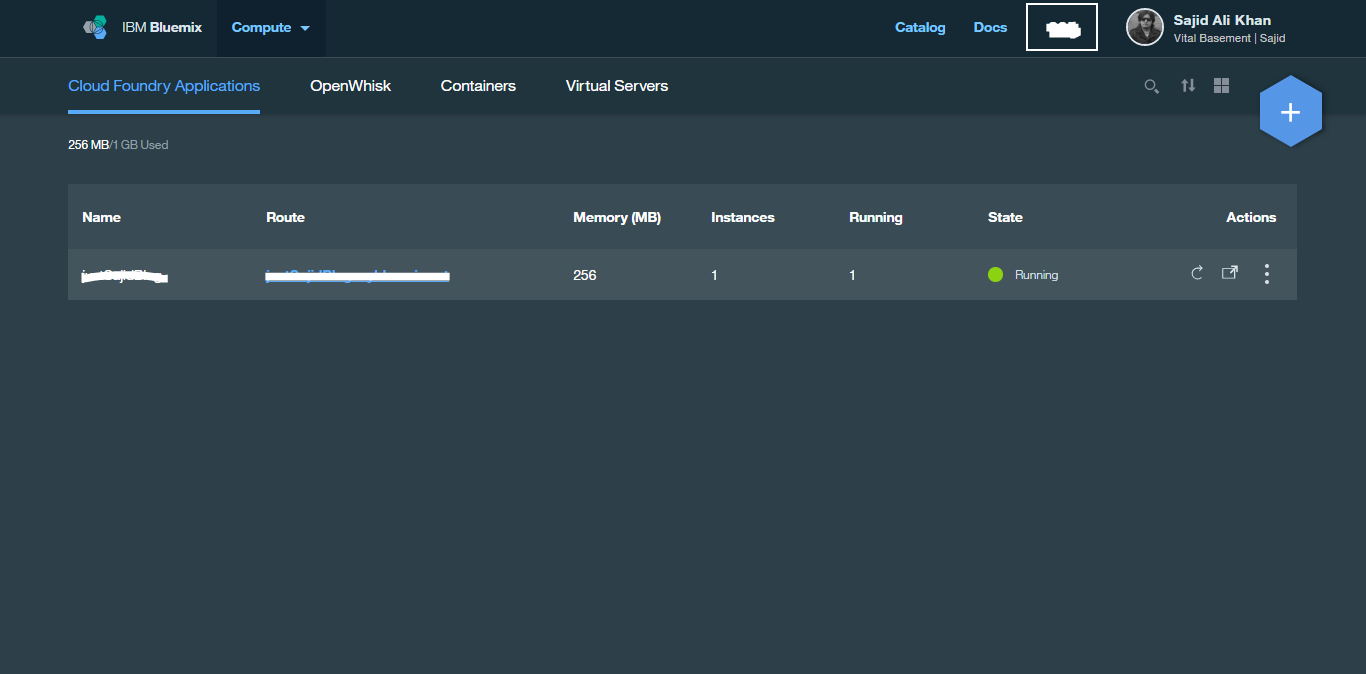
Before we continue, we will first return to the dashboard. You can now see our newly provisioned application as shown;
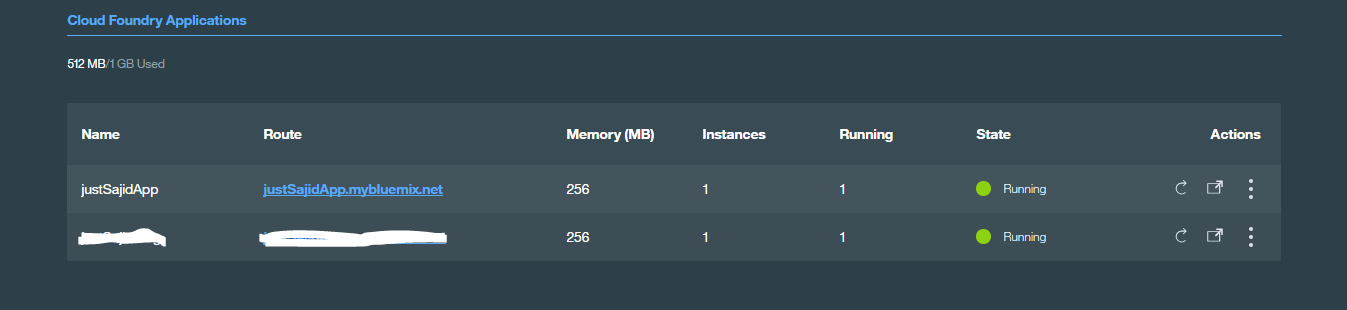
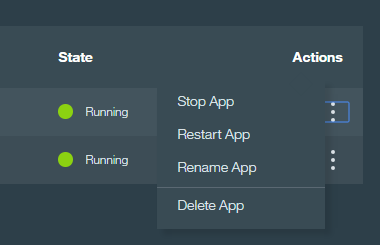
As we only selected a runtime, we don’t see any services listed just yet. From the dashboard, you can quickly interact with your apps to check health status. You can see that our app is running, and you can click on the cog at the top right of the tile to stop, start, restart, rename, and delete our app;
You can also modify the roots for your application here. You can open URL to link directly to your application, but for now, to return to the application overview page, simply click on the title.
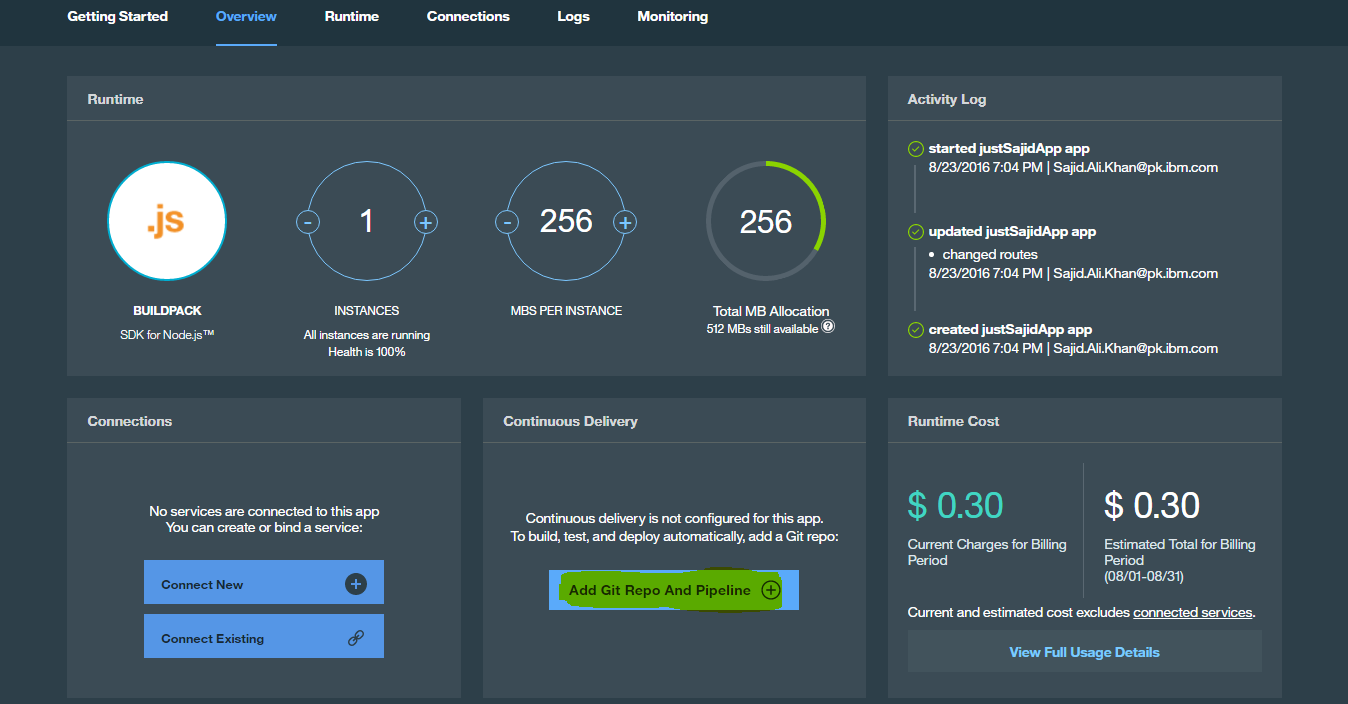
The application overview page gives access to some useful information and features. At the top, you can see the resource configuration for the application. You can see we have one instance with 256 megabytes of RAM per instance;
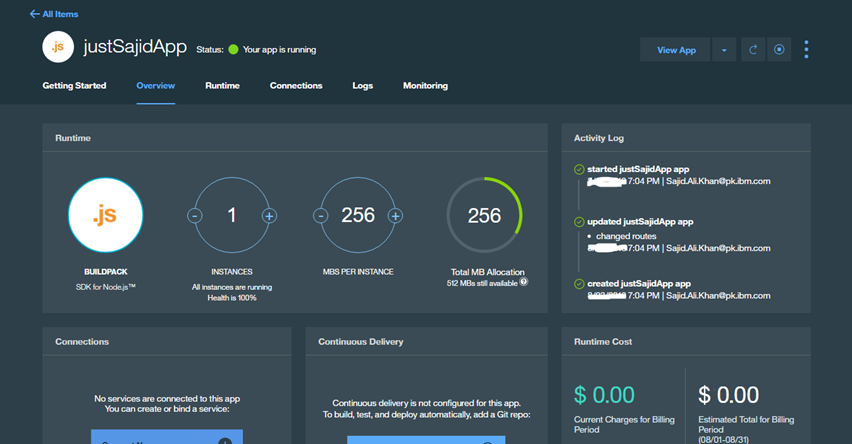
You can increase these, and click Save to allocate these resources to your application. For now, we will click Reset. On the right-hand side, we have our Application Health. You can see our application is running and we have the option to restart or stop our application. If you’ve created a small prototype application that doesn’t need to be running all the time, you may want to stop the app when you’re not using it so you’re not billed for something not needed. Below is your Activity Log and at the bottom, a link to the Cost Estimator Total. In the middle of the page, we have options to add or provise a new service and this will allow you to access the catalog or you can bind to an existing service you have already provisioned. At the bottom you can also mobile-enable your application.
Configure DevOps Services
To start modifying the code for our application, we can use DevOps Services. You can work with your app’s code in many ways. For example, with auto-deploy, you can modify the code that runs in your app by pushing changes to the Git Repository. You can auto-deploy your code if you use the Build and Deploy capabilities of DevOps Services. To enable auto-deploy from your Application Overview page, click Add Git;

This will allow us to create a Git Repository and populate it with the starter app code;

We can click Continue and you will see the Git Repository has now been created and it will be configured with the starter app application code;

We can now click Close and you will see our Git URL is now available;
If we click Edit Code it will launch the WebIDE and we will do this now. Our browser has now loaded the WebIDE located at hub.jazz.net;
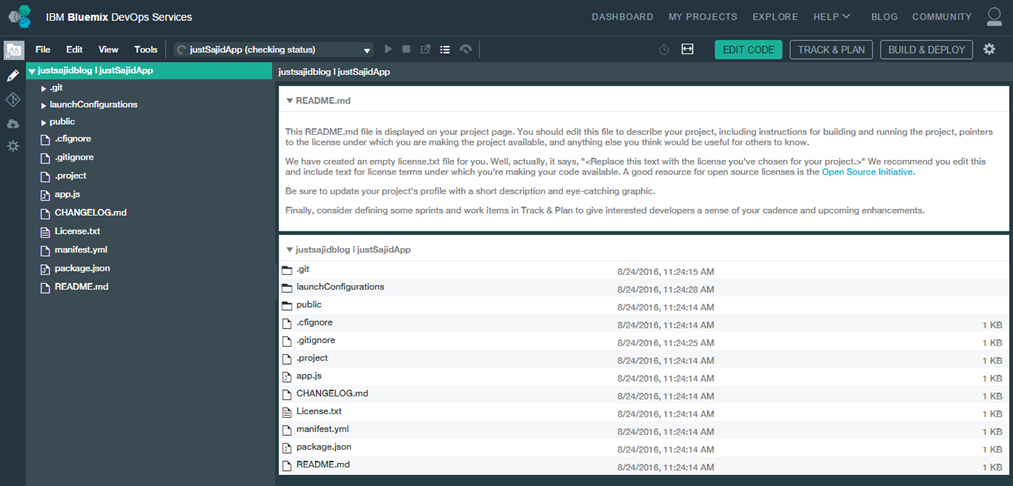
The integrated WebIDE is based on the Eclipse Orion open-source project. It enables you to edit files with syntax caller and support for multiple languages including HTML, CSS, JavaScript, Ruby, and Python. Some languages, such as JavaScript, also have support for syntax checking and code completion. Both for standard language constructs and for the services that Bluemix provides. Along the top we have our Main Menu. Next we have our Run Bar. Here you can see the state of your deployed app, you can stop, start, and deploy your app, open the dashboard and view it’s log or if you’re developing a Node.js app, the Run Bar contains additional icons for Live Edit Mode, where you can quickly restart the app and open debugging tools. We also have links to our add-on planning tools and finally our Build and Deploy, where we can access our continuous delivery pipeline. On the left is our File Explorer and at the far left are links to features such as the Git Repository, Applications, and Settings. If we next open a file, let’s say App.js, using the File Explorer, you can see the code file opens on the right-hand side;
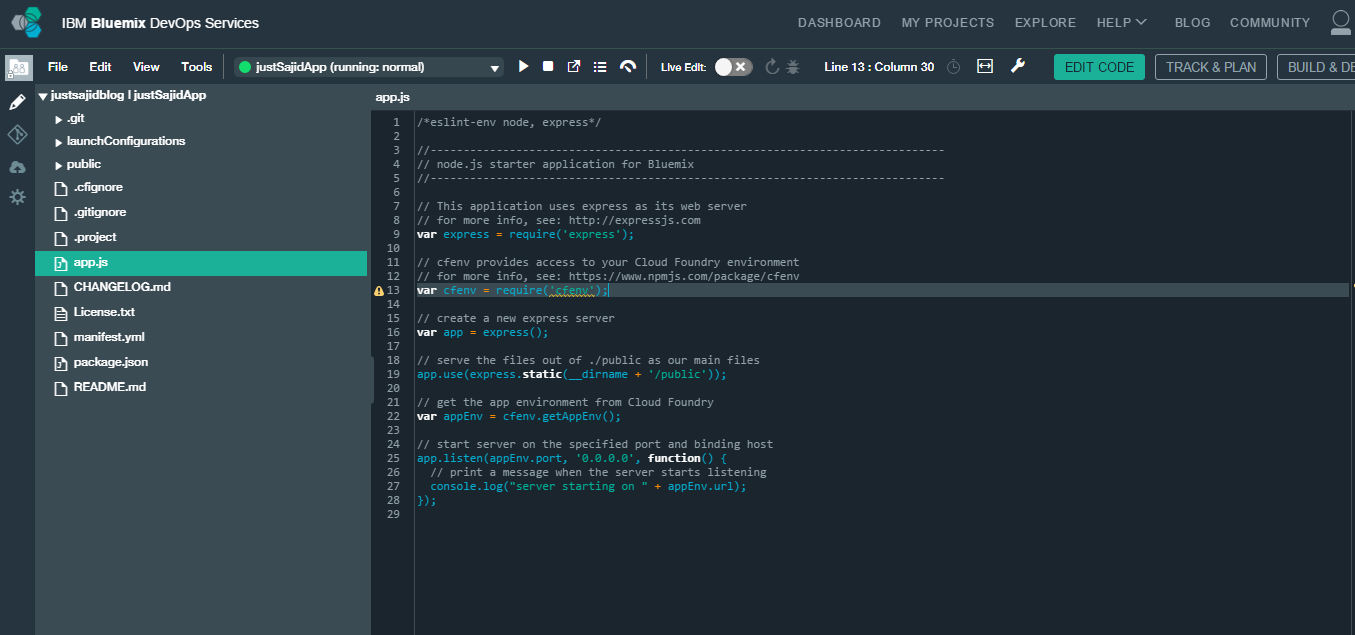
We have the ability to make changes directly in our browser. We can also use intellisense during code. Any changes made will be saved automatically or you can use File and Save from the Main Menu.
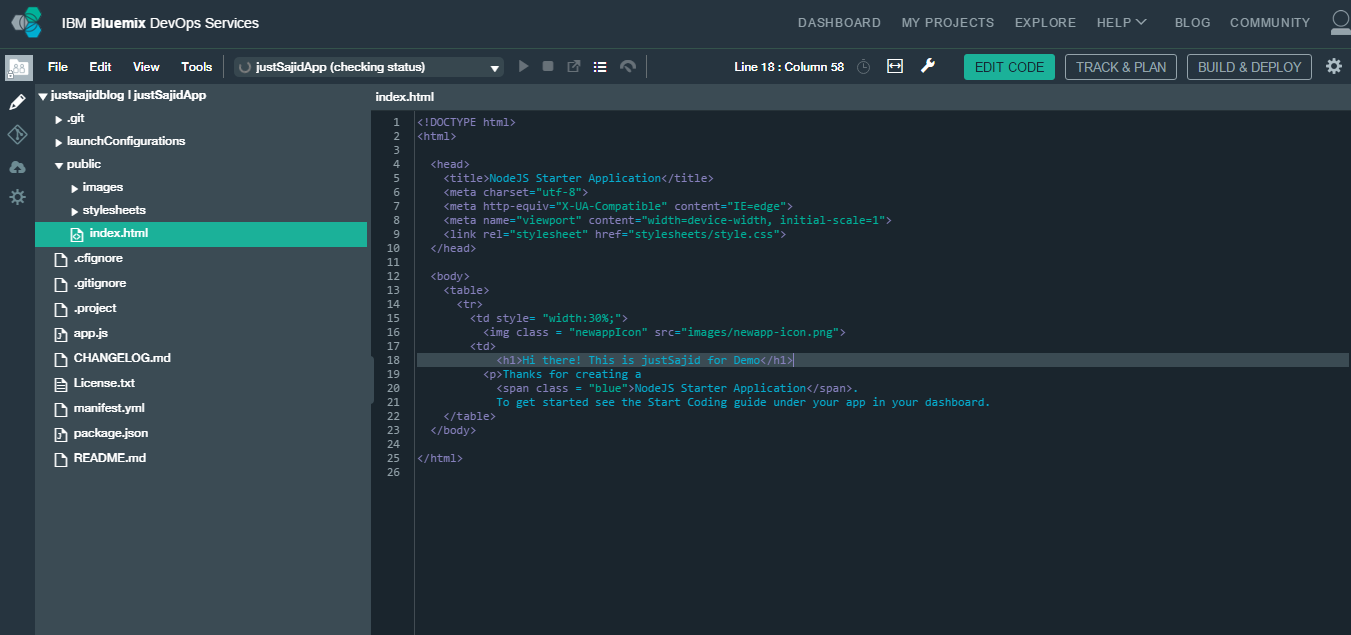
Next if we expand the public folder from your File Explorer, we can edit the Index.html page and publish this change live;
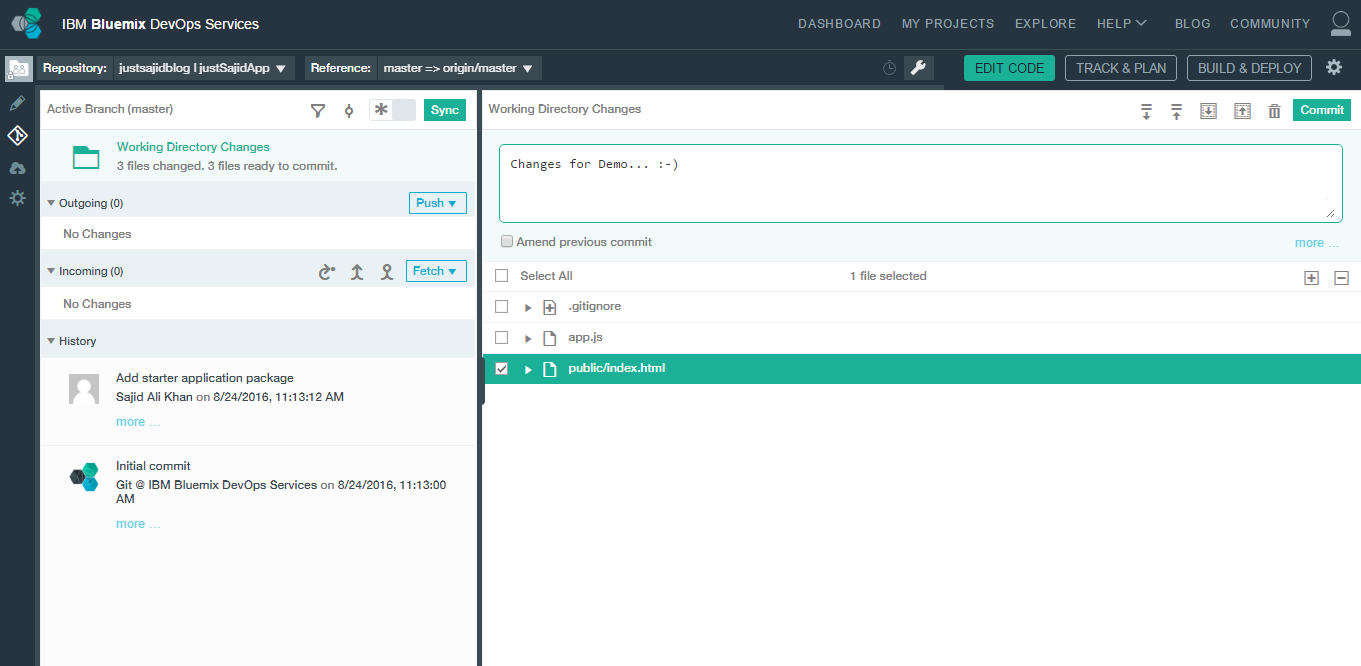
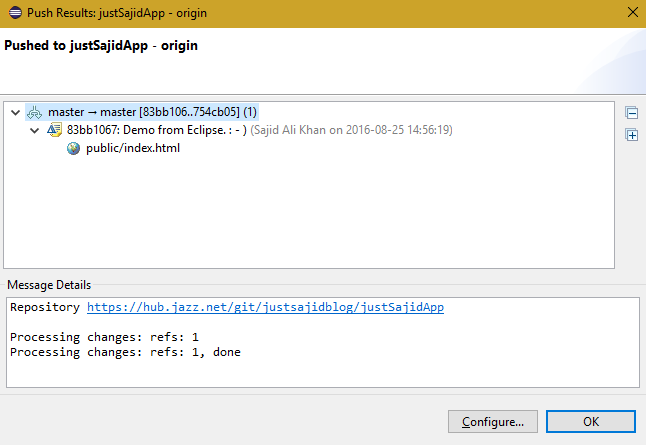
Now to publish our change we will click on the Git Repository icon at the far left. Under our Working Directory we will see changes that have been modified and we can see our Index.HTML page is listed. If we tick the checkbox beside the file, we can enter a commit message, Changed Header Title, and commit our change. Now on the left-hand side you can see we have our Changed Header Title commit is outgoing;
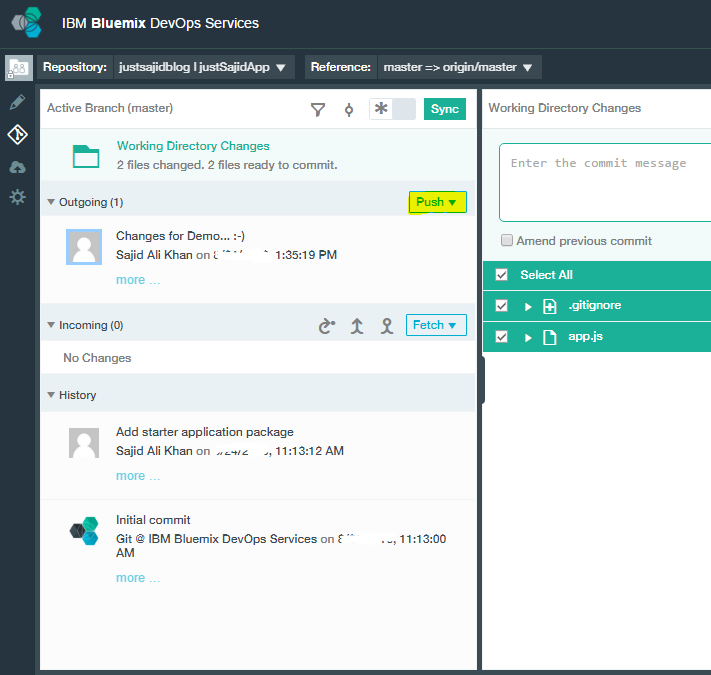
Finally, we just need to click Push to publish this change and you can see along the top that it said our push has succeeded;
To verify that your code was deployed, we can now click on Build and Deploy. We have now loaded our delivery pipeline and as you can see the Build Stage has passed successfully, along with the Deploy Stage. To view our changes, we can simply click on the link within the last execution result and you can see our changes have now been published. Our header has been updated to Insights App. You have now walked through the process of creating and running a Node.js Web App on Bluemix. You created a Git repository, populated with some example code, and automatically deployed the app. You also changed your code, and pushed the changes to the Git repository by using the WebIDE, and finally, automatically built and deployed your changes to production.
Now that we have seen how we can use the WebIDE. to modify our application code directly in the browser, let’s look at how we can also clone our repository to our local development environment and use our favorite IDE to make changes. There are plugins for business studio in Eclipse to support this, however we will walk through the process of cloning our code using the GIT command line codes and making changes using the Sublime Text IDE. We’ll then push changes back to our GIT repository on Bluemix. Back on our Node.js Application Overview page, we now want to copy the Git URL that was generated when we created our repository.
To clone this to your local machine we can right-click on the URL and copy the link address. We will be developing the Node.js part of our application on a Windows environment that has both Node.js and Git installed. However, the process will be similar if you wish to use Linux or MAC as your development environment.
From your development environment you can also use Command Prompt or Terminal to clone our repository.
(we can use the Git command git clone followed by the address we copied from Bluemix. We will be prompted for the login credentials for DevOps Services. We can now see our repository has successfully been cloned.)
We can use the command prompt to navigate to our new application and you can see the files that have been cloned to our local environment.
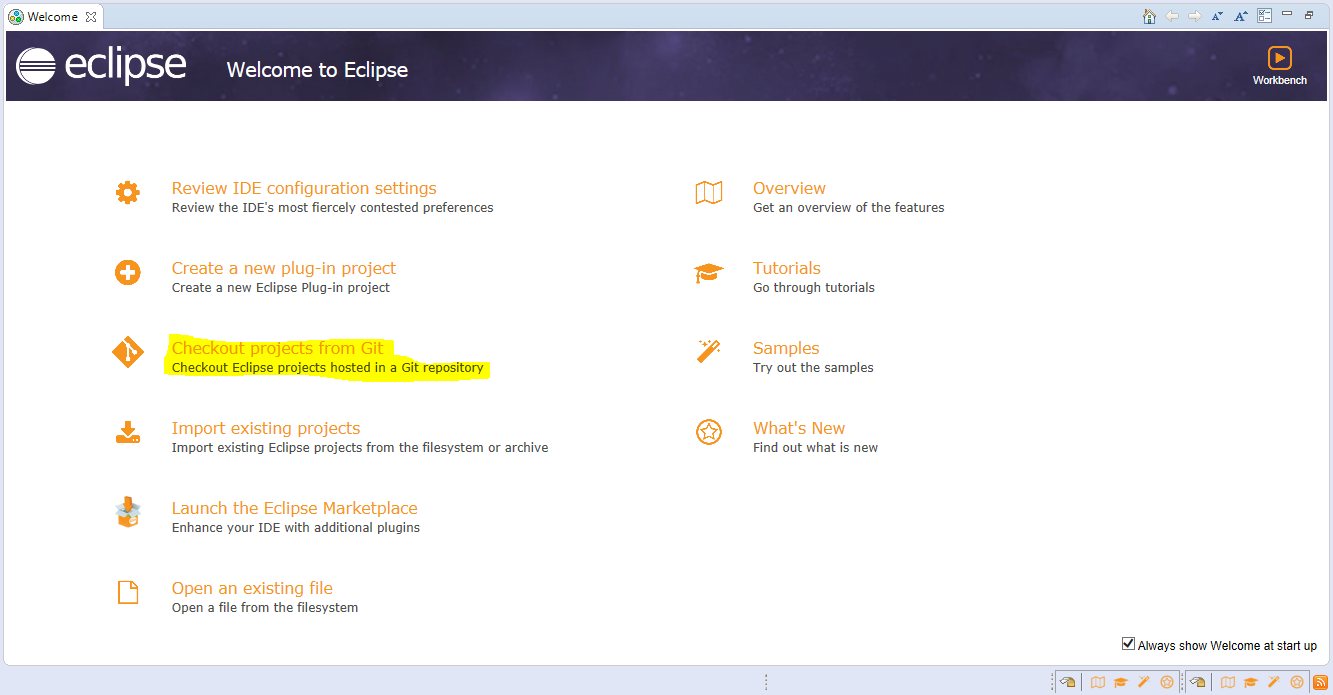
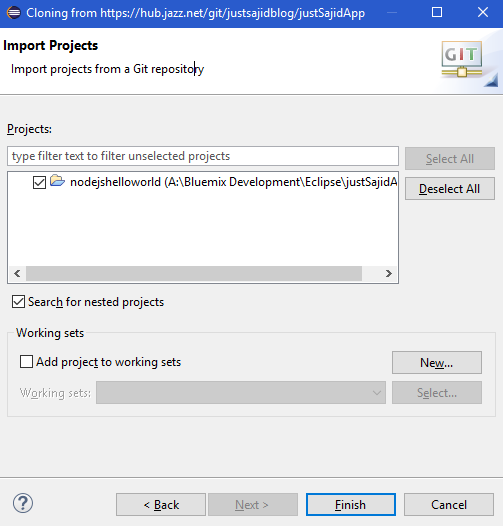
For now, let’s do clone the project repository from Eclipse. Simply go to Eclipse Welcome Window if you are new to Eclipse. From there, simply select the option of Checkout Projects from Git;
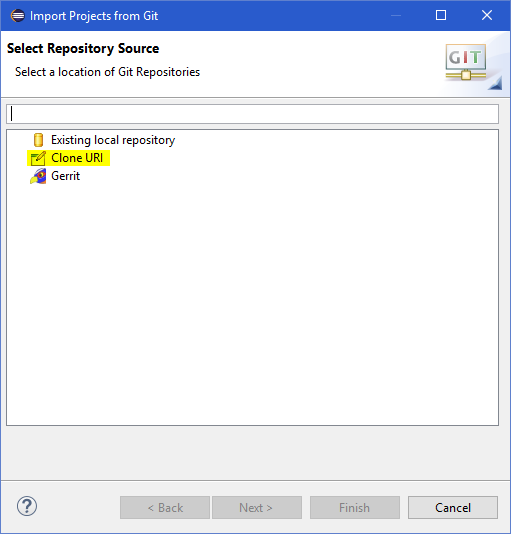
Now simply select the Clone URI and click Next;
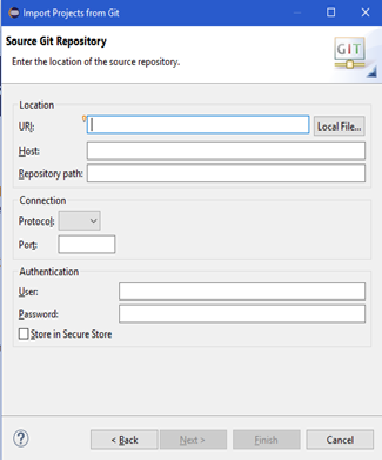
Now simply enter the URI and Credentials;
And it would take a time and take you to repository which you want to select. Further it will ask you for directory and after a moment it will ask you where you want to import your project;
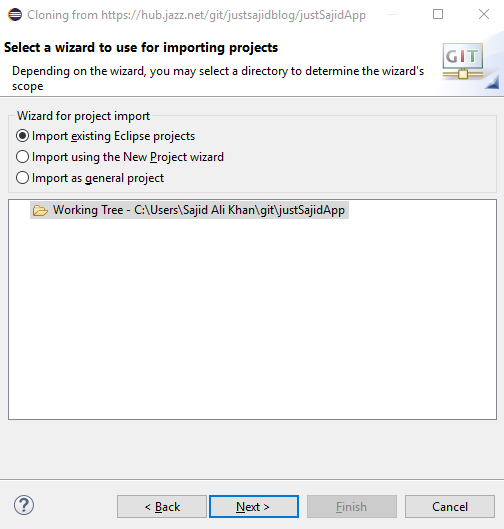
And when everything is set, simply click the Finish Cloning;
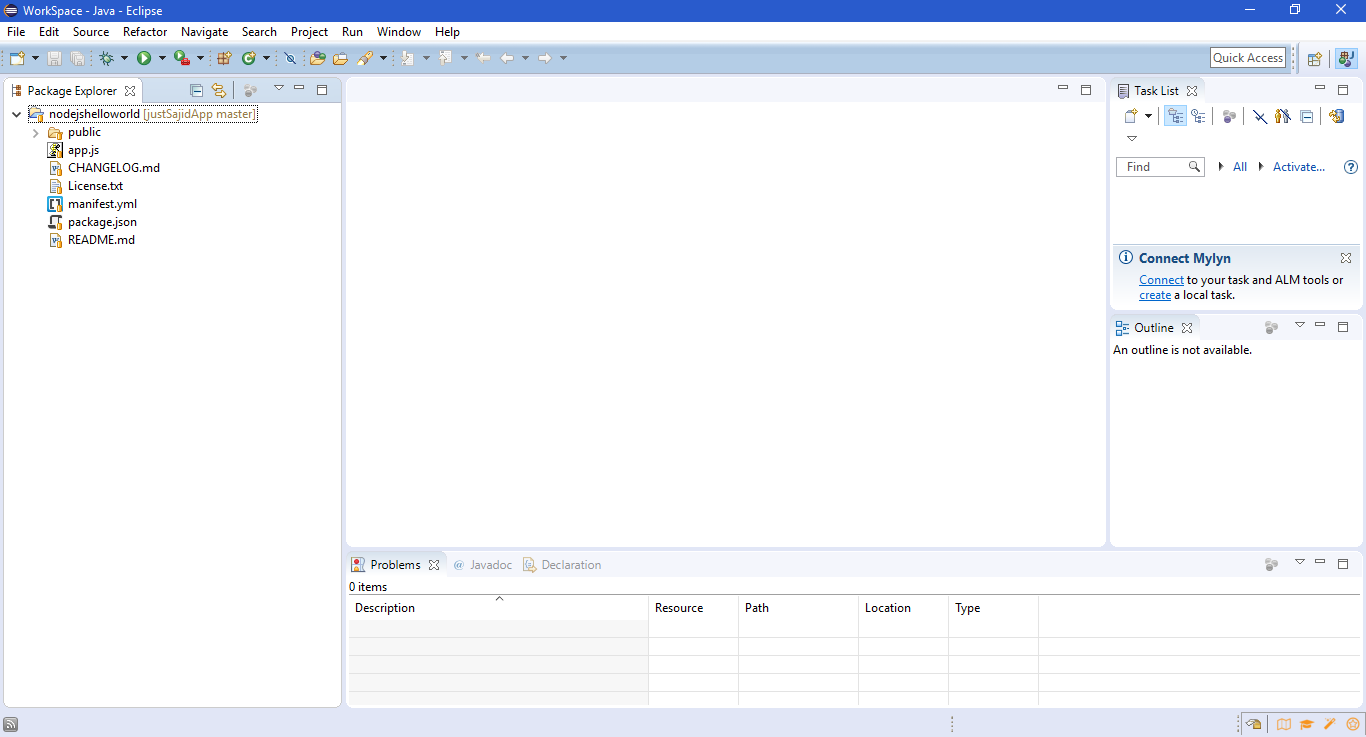
And Finally you have your repository cloned and open in Eclipse;
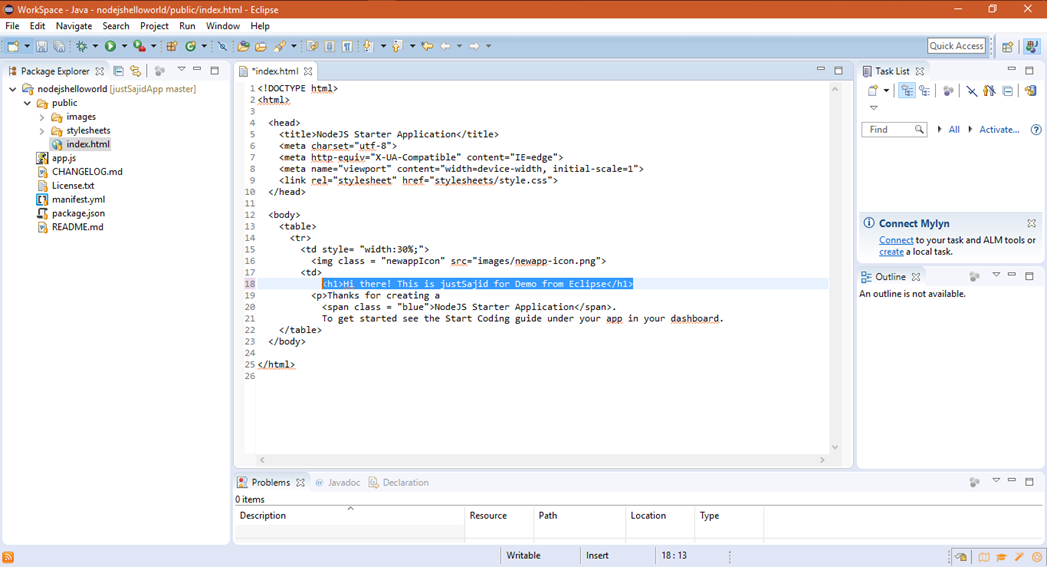
Now simply to do make the changes, open the index.html file in an Eclipse editor and make appropriate changes as per your need;
Now simply save the changes whatever you need to done and simply commit and push the stuff to git. For that simply right click the project and go to Team>Commit. Now you will see the Git Staging Tab will appear. Simply add a Commit Message and click the Commit and Push button;
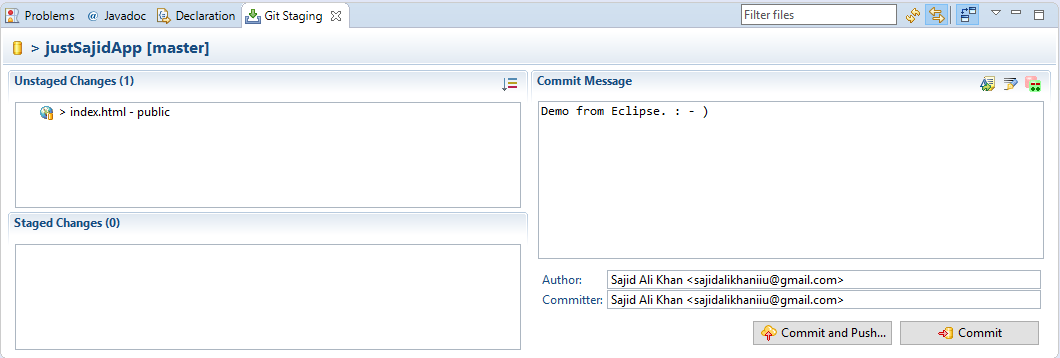
Now simply right Unstaged Changes and conform it. And when everything is done simply click Commit and Push Button;

Now process will take its time and after it done you will see the result dialog;
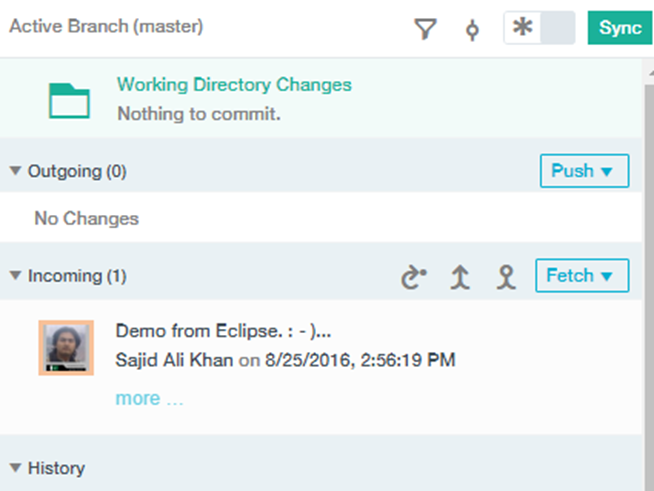
Now, to assure the pushed happened, simply go to the dashboard of the portal and if you go to the app URL you can see the changes accord;
Now if you go to the active branch of Git, you can see your changes history over there;
So the change has been detected by the DevOps Services and it will stop and restart our application deployed with the new changes. If we now open our app, we can see our change has been updated, Insights App Local Git Change, which we modified from our local development enviroment and the change has been published live. This is because the Build and Deploy pipeline is configured to automatically detect any changes pushed to Git and rebuild and deploy the application. If we open our WebIDE again by clicking Edit Code and have a look at the Build and Deploy pipeline, we can see there are two steps configured, the Build Stage and the Deploy Stage. If we have a look at the configuration for the Build Stage by clicking on the cog and Configure Stage onto the Input tab, we can see the stage trigger runs when a change is pushed to Git. So, as soon as a change is detected within the Git repository the Build Stage will automatically run. Under the Deploy Stage configuration, under the Input tab, again we can see there is a trigger that will automatically run when the previous stage is completed, in this case the Build Stage. This is a very basic Build pipeline, however, you can add the stages necessary for your Build pipeline, including execution of your tests.
Provision Node-RED Starter
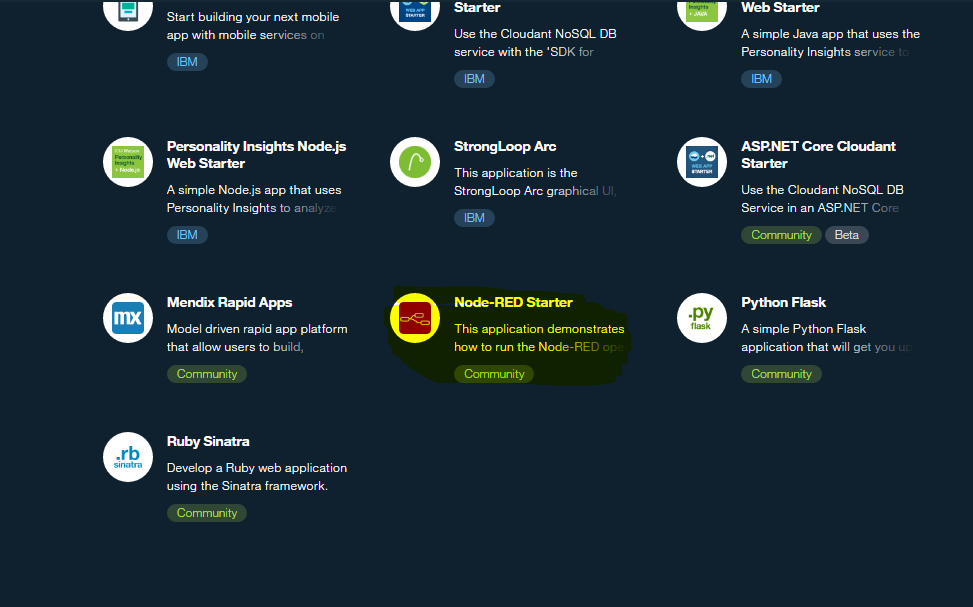
You’re now ready to provision our Node-RED boilerplate and have a look at creating some basic workflows. From our dashboard, to access the boilerplates we can go to Compute Category and go to add new runtimes or boiler points. From there, in Boilerplates, simply select the Node-RED Starter;
Now simply enter your credentials and click Create to begin staging the boilerplate app.
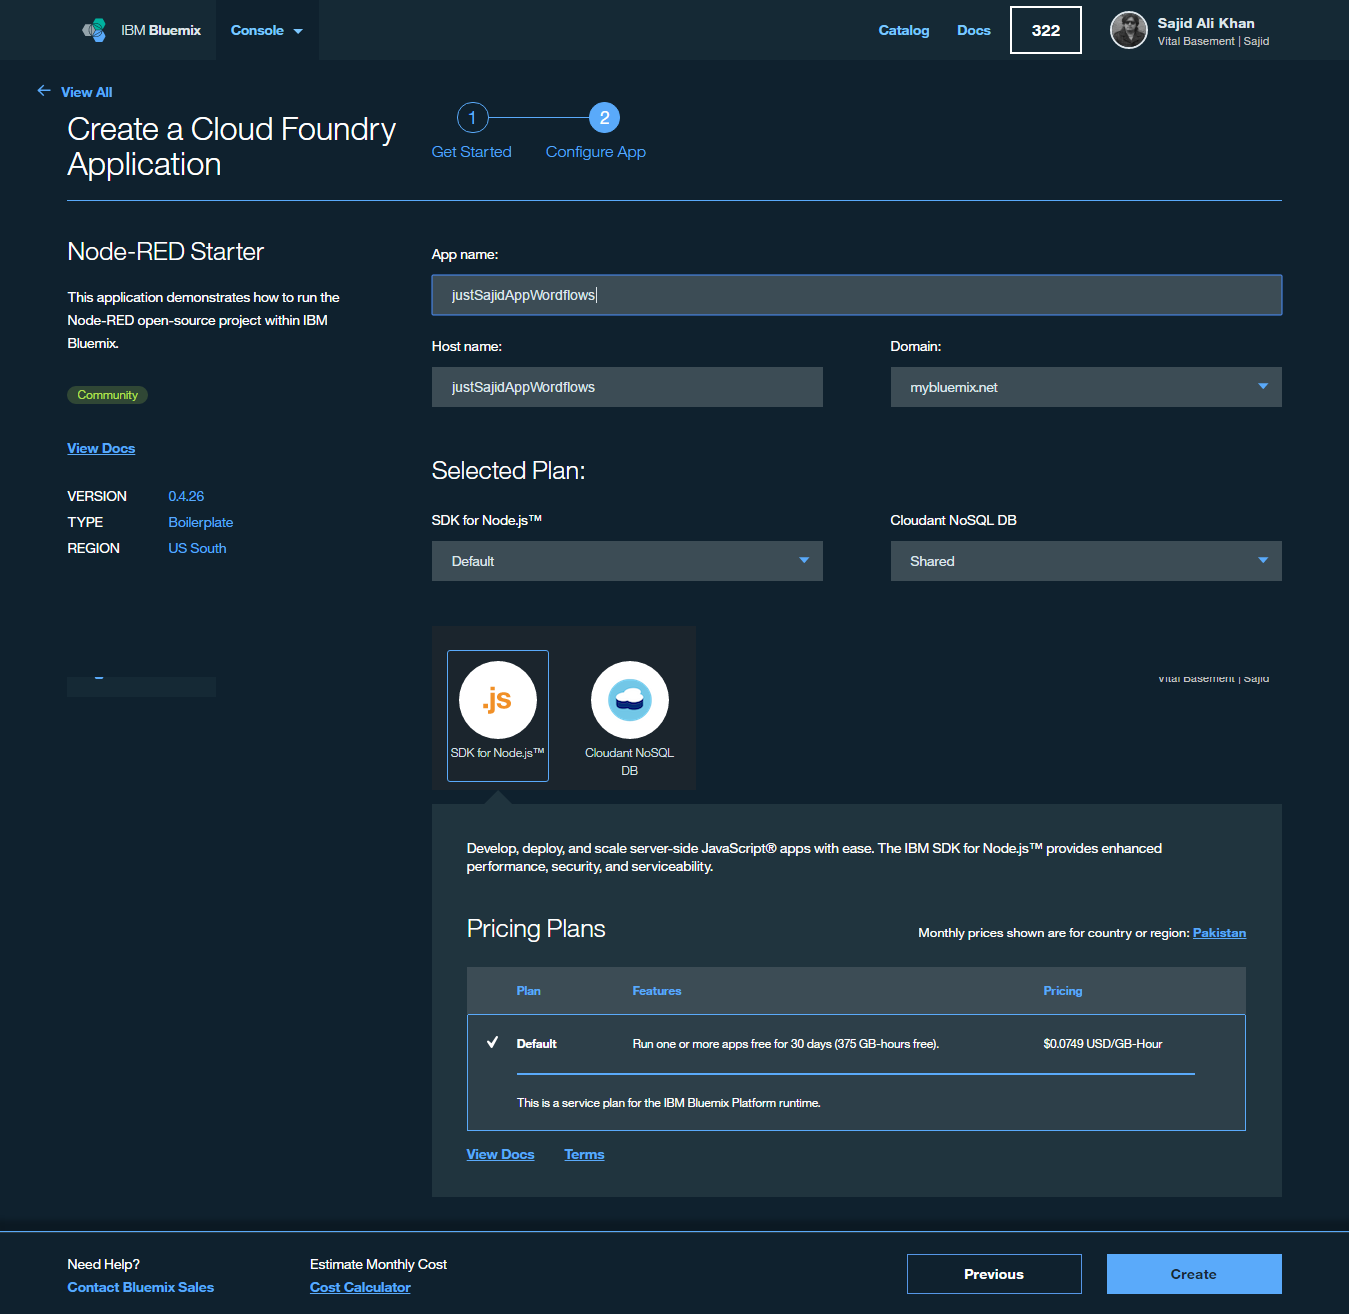
Staging is now complete and the app is running under the host name provided;
First Look at Node-RED Workflows
To launch our Node-RED application we can simply click on the URL. We are now on the Node-RED landing page and the first thing you will notice is the description, A visual tool for wiring the Internet of Things;
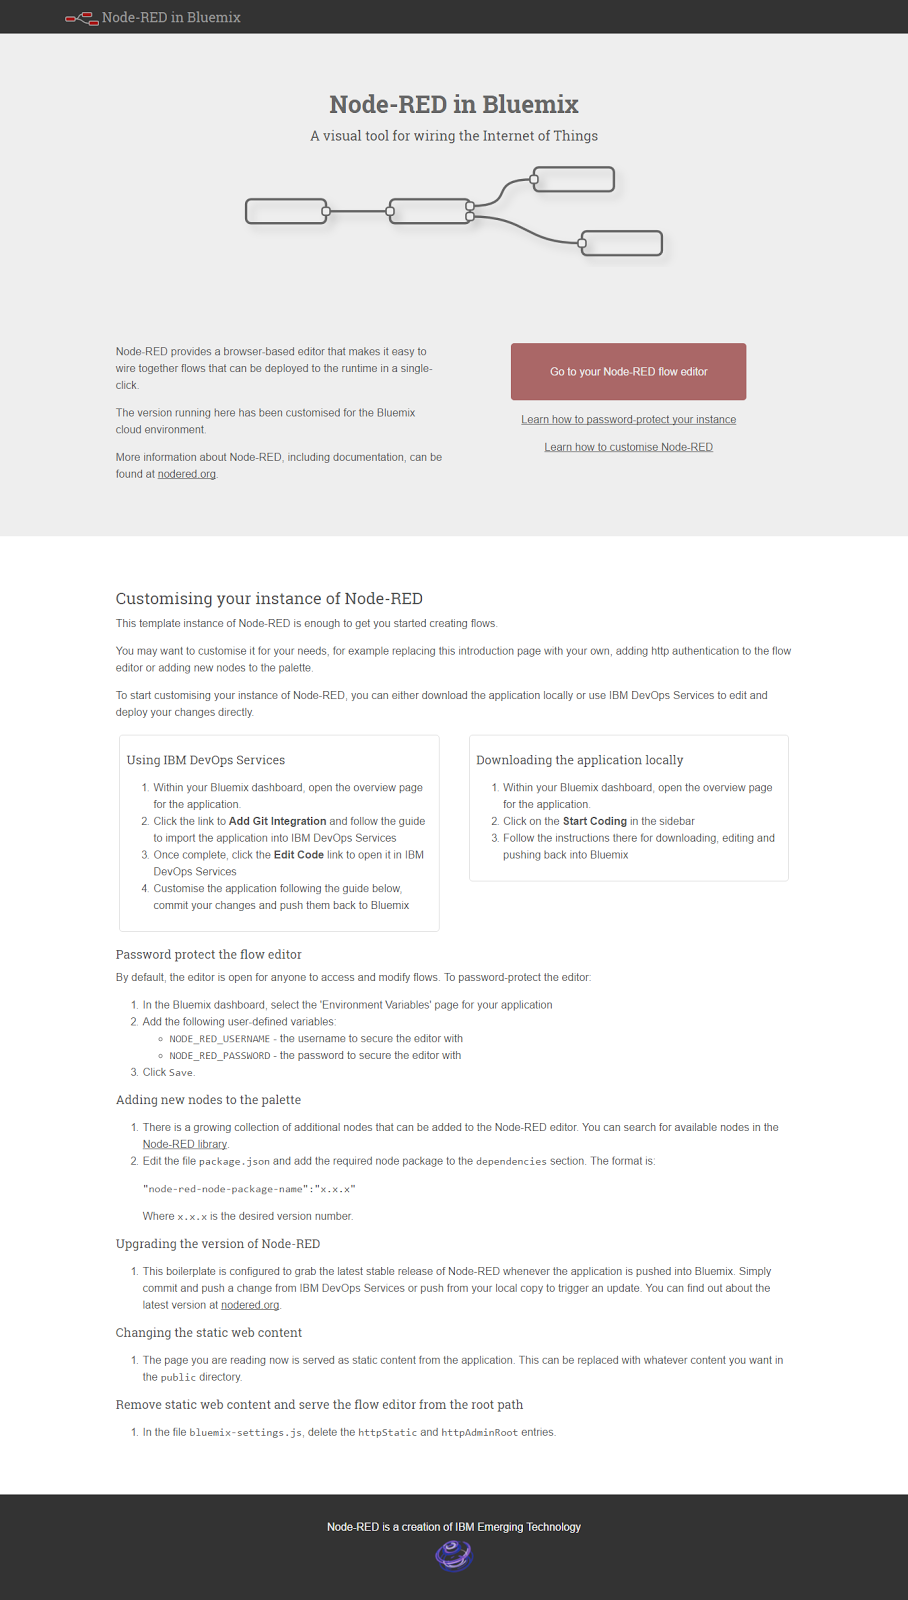
Node-RED is a fantastic entry point for exploring some of the services available on IBM Bluemix and trying out or brainstorming ideas very quickly without having to worry about any plumbing code. This is just one of many different ways that you can leverage and interact with Bluemix and others will be demonstrated throughout this course.
To start building our first workflow, we can click on Go to your Node-RED flow editor;
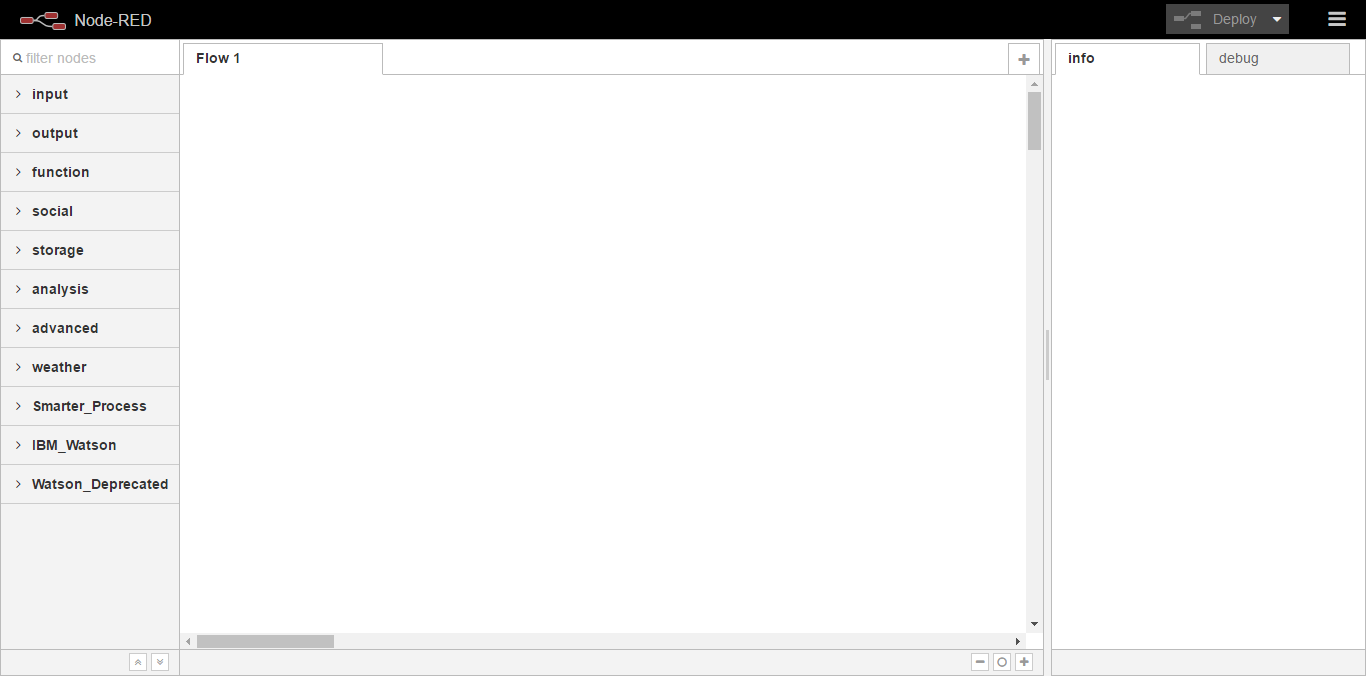
Now that our editor has loaded I’m just going to highlight some of the key features;
- In the center we have our workspace, this is where we will drag and configure nodes.
- On the right we have tabs for info on a selected node or debug, where we can output messages from our workflows or identify issues.
- At the top we have a button which will allow us to deploy our workflows when they are ready.
- And finally, on the left-hand side, we have the series of nodes available. We have nodes for input, which will allow us to capture data into our workflows. This may be for a HTTP request, websockets, or even from devices on censors when building an IOT application.
There are nodes to push data back out from our workflow. Functions to manipulate data. We have social, storage, analysis, and finally IBM watts and nodes. We will cover these in more detail throughout the course.
To get started building our first basic workflow we can simply click and drag a node. We will start with the inject node, click and drag onto the workspace;

The inject node is very useful if you just want to test the flow of data through any connected nodes.
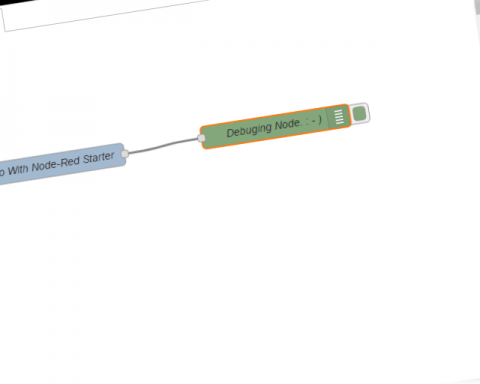
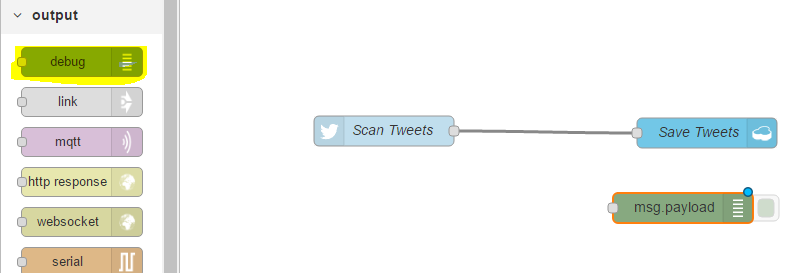
Next, we will provide an output and in this case we will select debug, click and drag;
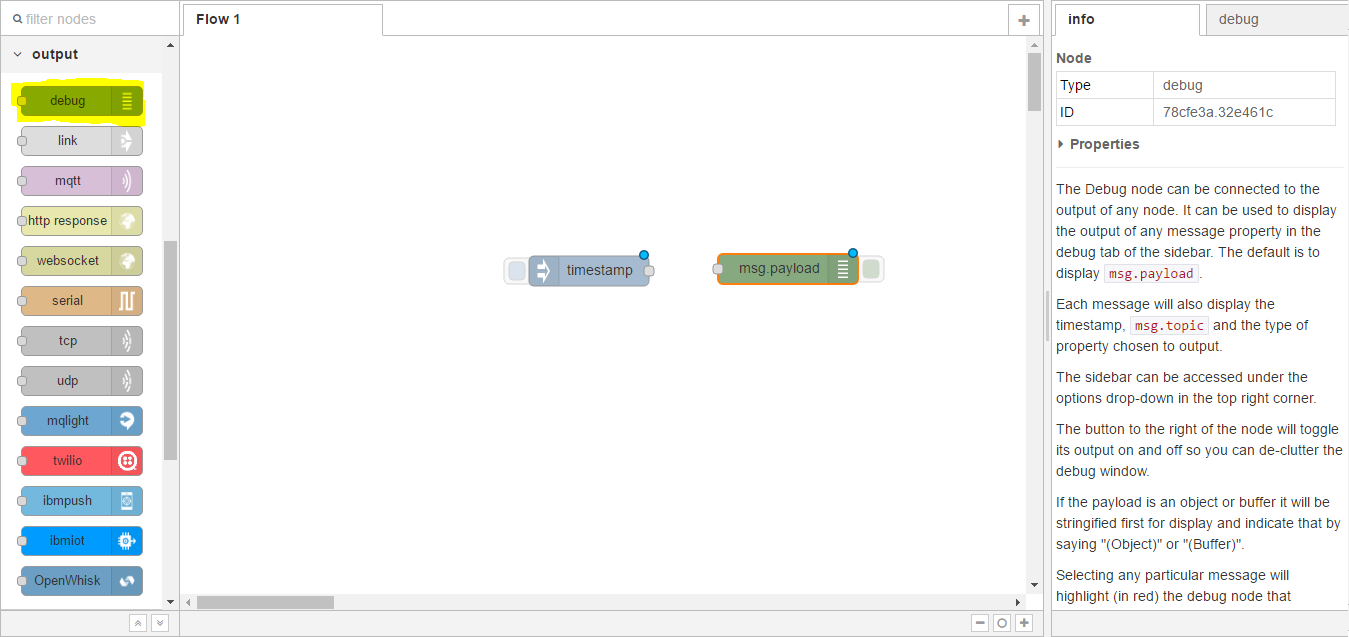
Debug is very useful, as it will display any message data that is sent to the node.
You can see the little blue icon at the top of each of the nodes and this denotes a change has been made to the workflow but has not yet been deployed. To link two nodes together, you can click on the little connector and drag between two nodes;
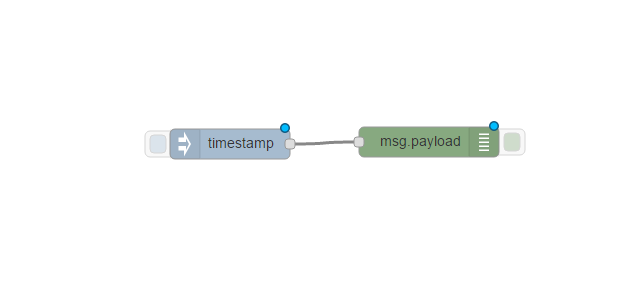
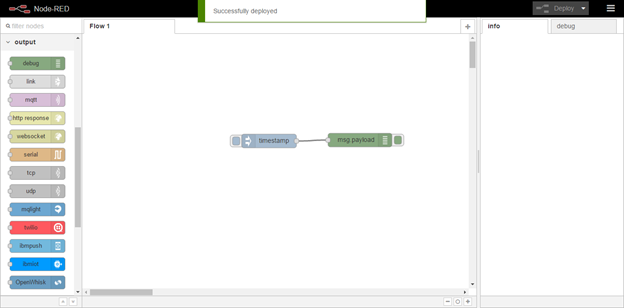
You can see these have now been connected. To test our workflow we can click on the button at the left-hand side of the inject node. This will push a timestamp into our workflow and the debug node will then output the message to the debug tab. Before we can use our workflow, we must first Deploy. We can do this by clicking the Deploy button at the top right of the page. You can see the message it has been successfully deployed;
And now if I click on the button on the left-hand side you can see a timestamp has been injected and if we look at the debug you can see the timestamp has been output;
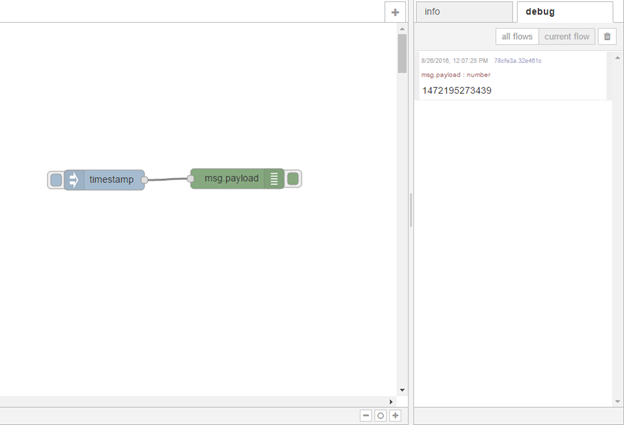
So the data has gone from the first node successfully into the debug node. Now that we have seen a very basic workflow let’s build upon this to create a workflow that will hopefully give you a better idea of the par and flexibility Node-RED can offer and why I feel it is such a great tool to use when trying out or experimenting with services or brainstorming or prototyping your ideas on Bluemix. The flow will allow us to capture information from Twitter, store it into a database, and make the results available for an HTTP request.
First, empty your workspace along with Debug window to build our new workflow.
To start building our next workflow, under our nodes scroll down to the social category. Here you can see we have nodes for twitter and e-mail. We want to use the twitter-n node, which can be used to search Twitter. Click and drag onto the workspace;
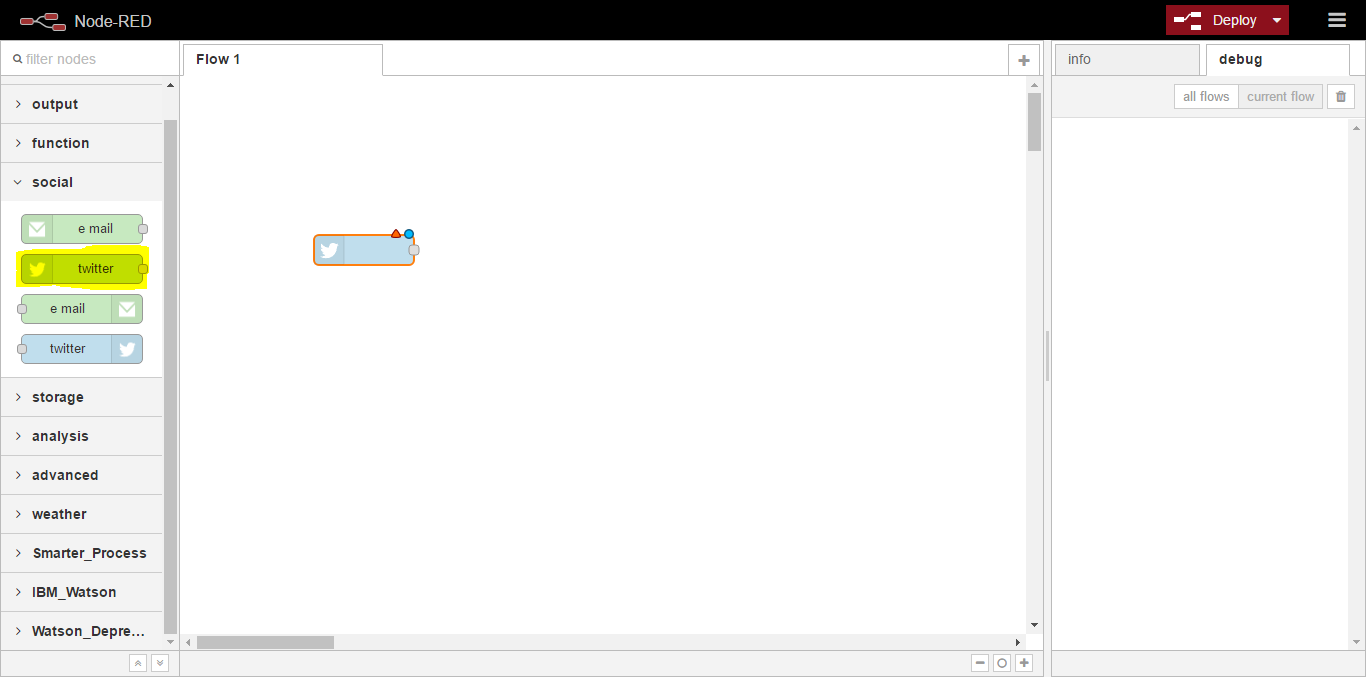
Once the node has been added you will notice, along with the blue circle icon, there is also a red triangle icon. This means that configuration is required before we can deploy the workflow. Double-click on the node and you will see it requires Twitter credentials along with some options on what we want to scan Twitter for;
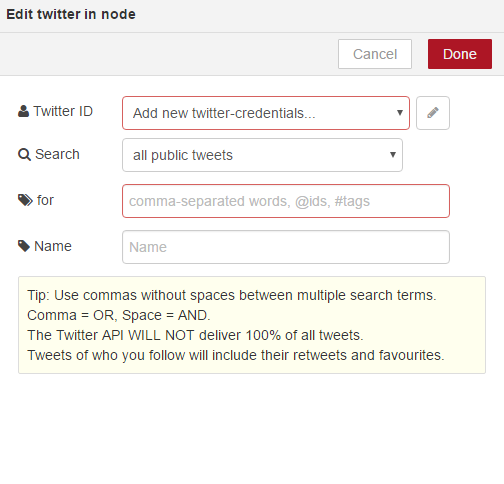
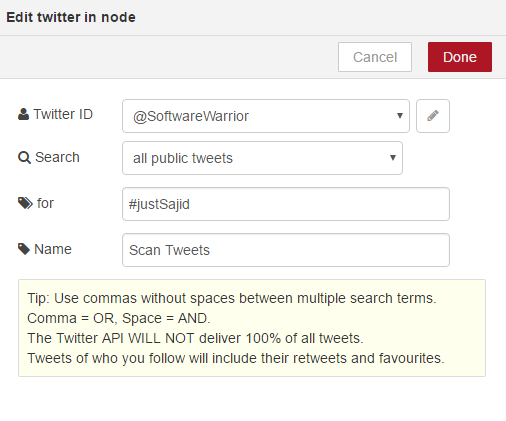
To configure the Twitter credentials, click the pencil icon to the right of the box and click here to authenticate with Twitter. From here you can add the Twitter account you want to use for Bluemix. Click to authorize the app and once authenticated you will be prompted to close the window. You will now see the Twitter ID is displayed. We can click add and next we will provide the details of what we want to scan Twitter for. We will you the hashtag, #justSajid We will give it a friendly name, Scan Tweets, and click Done;
You will now see the red triangle icon has disappeared.
Next, we want to store the tweets to a database and we will use Cloudant NoSQL database for this. On the nodes from the left, this time we want to look under storage. You can see we have options for mongodb, cloudant, dashDB, and others. In this case we want to use the cloudant out node, which will allow us to store information into Cloudant. We can click and drag on to the workspace;
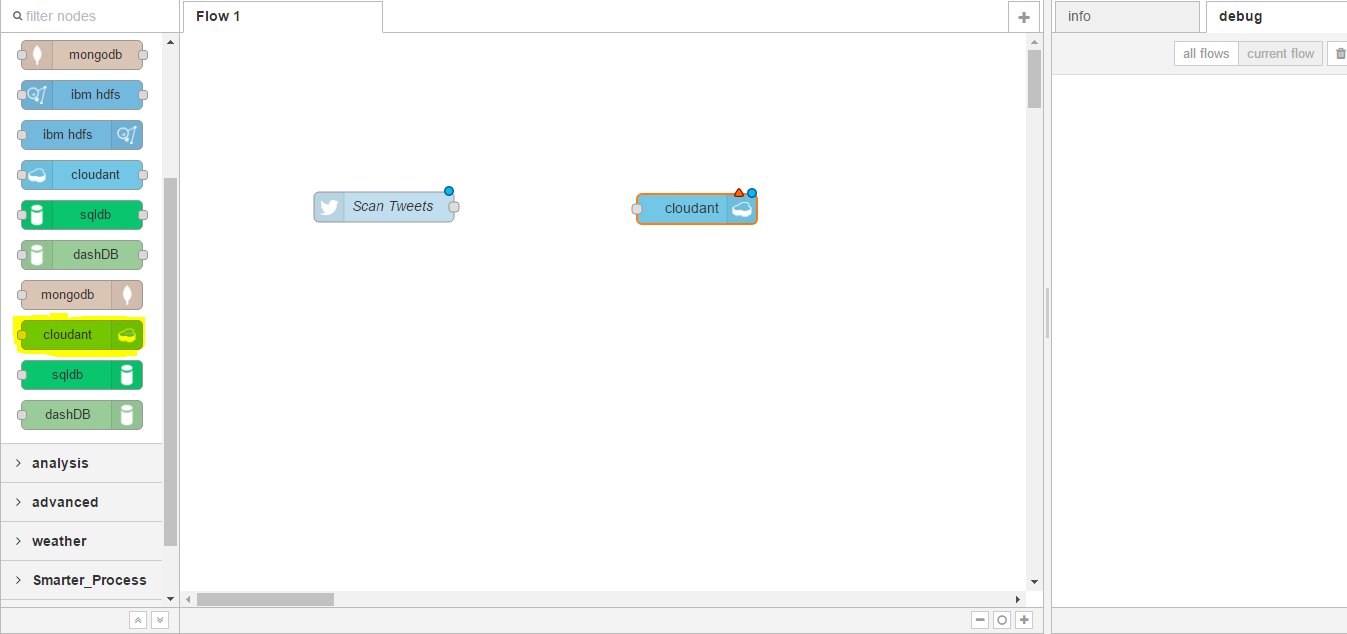
And again, you can see the red triangle denoting it needs some configuration. We can double click on the node and in this case we want to select the service.
In our case it will be Insights workflows Cloudant NoSQL database and this was provisioned when we provisioned the Node-RED boilerplate application. Next, we want to provide the database name. We will use tweets and ensure this is in all lowercase. We have the option of insert or remove. We want to insert data. We can select, Only store the msg-payload object, and we will go into more details on the message object in the next module. Finally, we will give it a name, Save Tweets, and click Done;

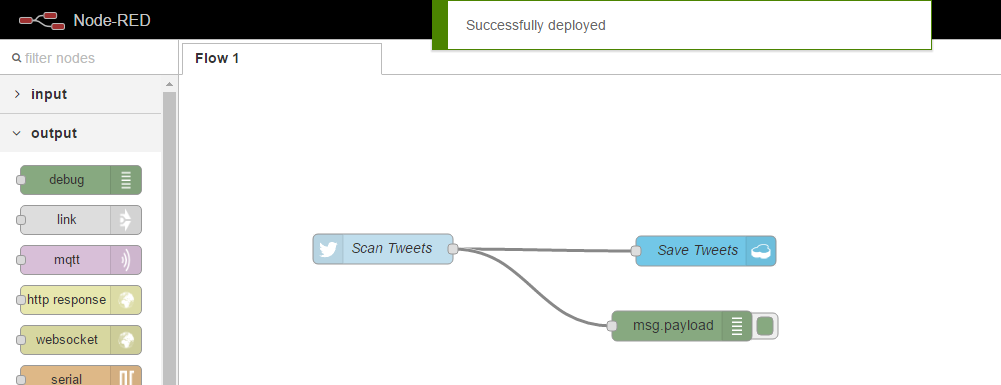
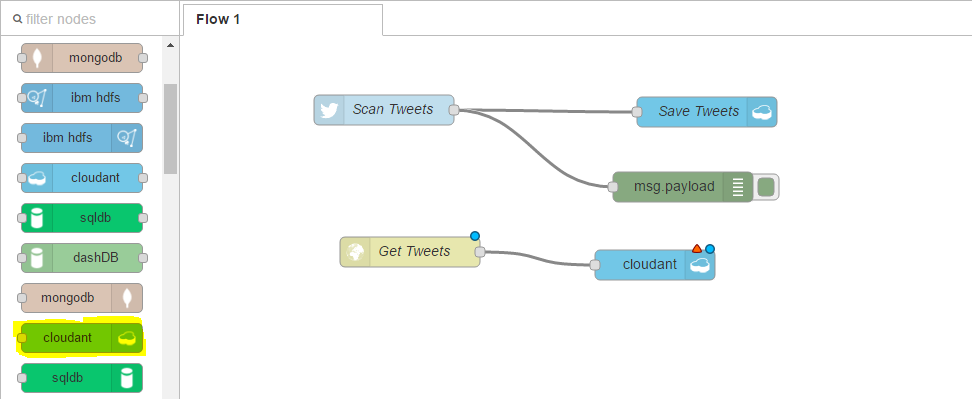
Now, we just need to link these two nodes together and again we can click on the left of the Scan Tweets node, drag with our mouse to the right of the Save Tweets node;

We can click Deploy, Successfully Deployed and you can see the blue icons at the top right are now gone. We could just test this workflow as it is, however I’m going to add the debug node as well.
This is very useful when you want to see what data is flowing through your workflows. And again, I will deploy this.
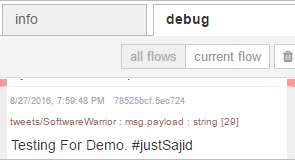
Now, let’s post a Tweet using our hashtag. Hello Bluemix and our hashtag was #justSajid. If I now click Tweet, you can see the Tweet was posted and if we return to our Node-RED flow editor, have a look at the debug, you can see the Tweet was picked up within the debug;
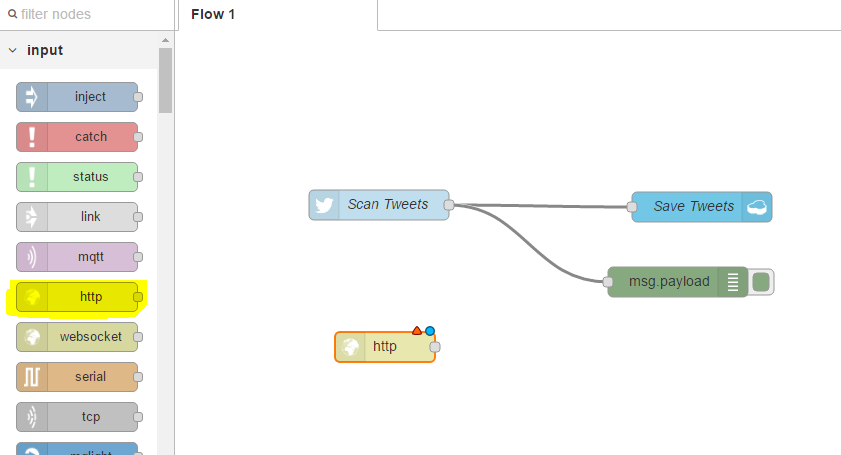
To check the Tweet was saved, we can go into our Bluemix dashboard, find the Cloudant service, and check for the data directly in the Cloudant database. But an even easier way is to use the HTTP notes to create a simple REST API. To do this we will drag on the http-n node from the input category;
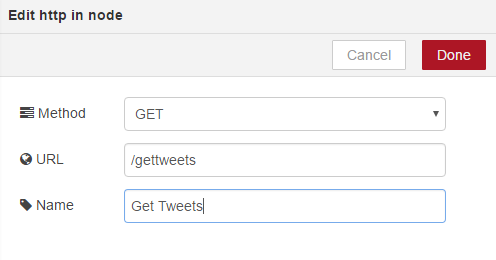
We will double-click to configure, add the URL, get tweets, and add a friendly name.
Next, we want to drag on the Cloudant-n node;
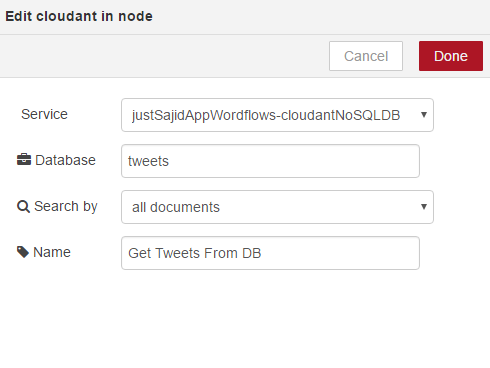
Again, we can configure it. We can select our service. The database name, which we provided as tweets. And we will return all documents under the search-by. Finally, we will give it a name, get tweets from db, and click okay;
Because we are using the http input node, we must always return a response back to the browser. For this we will use the http response under the output category;

We can link this to our cloudant node. Click Deploy;
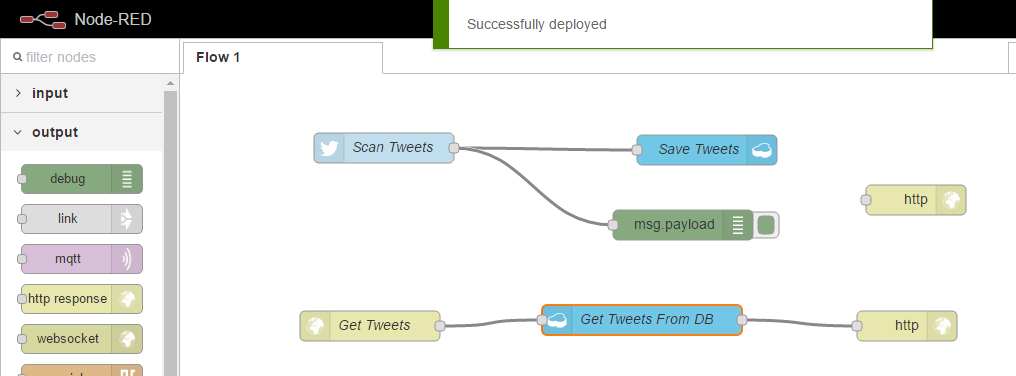
And we can now test our new flow. To do this we can copy our host name and the (mumbles) URL we had specified when configuring our node;
You can see the Tweet we had posted, Hello Bulemix, is now avilable under our API endpoint. Hopefully this helps give you an idea of how useful Node-RED is for building applications on Bluemix. In the next module we will be using the skills we have learned so far to build a Node.js application using DevOps Services that interact with workflows on Node-RED, pull-in services such as Watson and Twitter.
Building Your Application: Workflows
We will now take a look at the application we will be building for the remainder of this course. We will start by taking a look at the workflows within this module. This will build upon the NodeRed application we presented in the previous module. In the next module, we will then look at how we can build out a client Node.js application that interacts with the workflows.
- Application Architecture
We will quickly walk through the workflow our application will follow. From the Node.js application, a user can search justSajid author data stored in the JSON file. The user can see the author profile and click analyze to analyze the data. This pushes the author data to a NodeRed workflow via an HTTP post request;

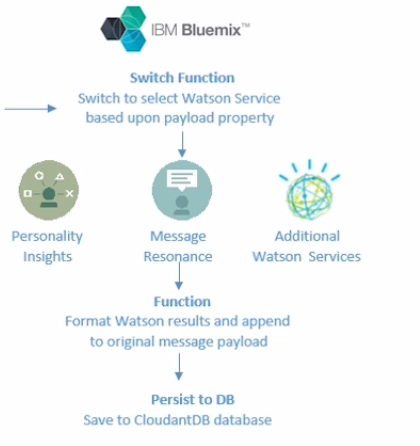
Within the NodeRed workflow, the data is post to a Watson service for analysis. In this case, we’re using the Personality Insight Service. However, it can be any of the Watson services that have a node available. And we will show how you can use the workflow to select the desired service;
The Watson results are formatted and appended to the original message data.
We then store the data to a Cloudant DB Database;
And the full message data is returned back to the Node.js application found on its HTTP response;
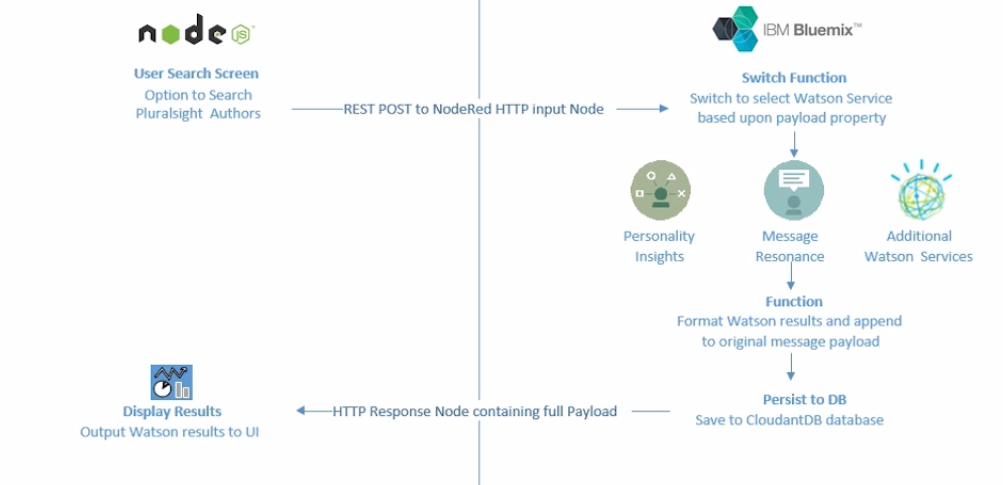
Within the Node.js application, we parse the return data to display the Personality Insights results generated from Watson. We render all of the AI using angular js and a chart plugin.

Next, we add social media support to our application by adding a Tweet Results button to our results page and clicking the Tweet will post the URL of the results page to NodeRed, via an HTTP post request and NodeRed workflow then posts the message to Twitter, along with a hashtag, #justSaijd;
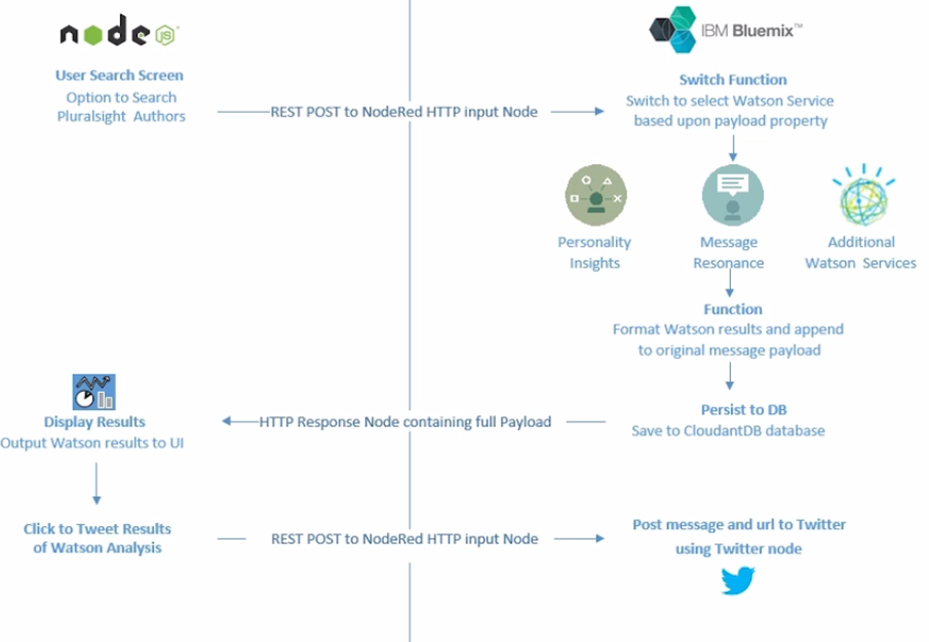
And we append this tweet to the original data in Cloudant DB. Finally, an HTTP get request will return all data, including the personality insights and any associated tweets for the author. Back in our Node.js application, we can update our results page to display all of the associated tweets;
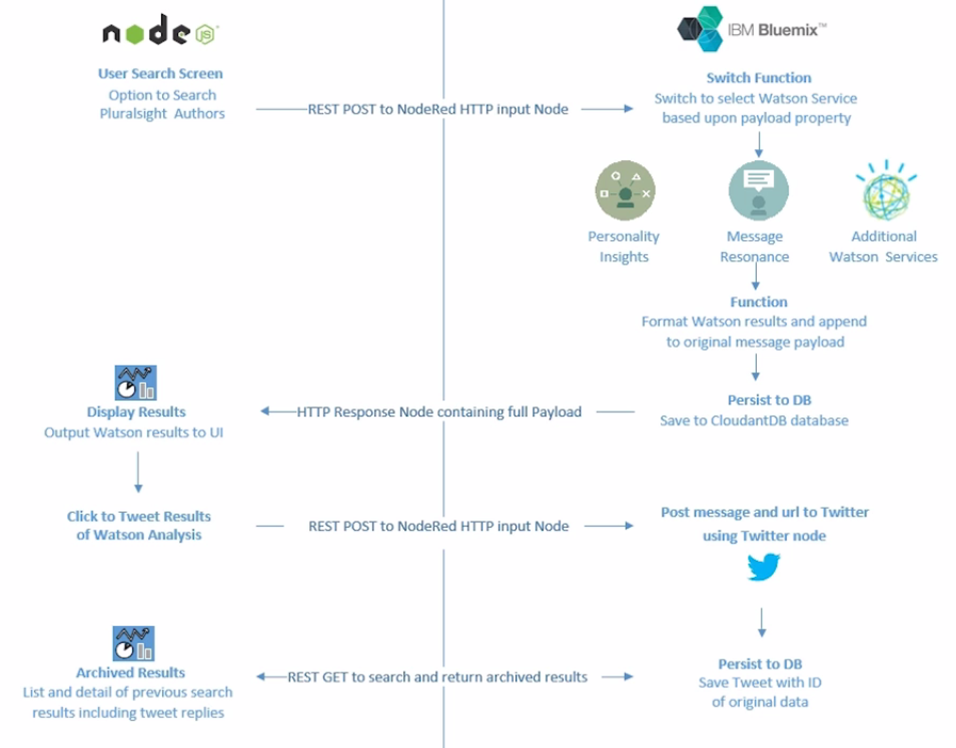
The application we are developing is quite generic and can easily be adapted for many different use cases. For example, instead of Pluralsight authors, the data could be from an online API for pretty much any data set containing a body of content, such as publications, or the data may come from a center or device and instead of using Watson, it may use a push notification service to alert when a threshold has been reached, such as a room being too warm or too cold. This is just another example of how you may want to build out your workflow for your application.
Start the Node-RED Workflows
We will start by building the workflows needed for our application in NodeRed. Open your Bluemix dashboard and navigate to the insights workflows application we provisioned in the previous module. From our application overview page, we can click at the URL at the top to open our NodeRed application and click to continue to the NodeRed flow editor.
Highlight the existing nodes we created in the previous module using your mouse, and click Delete to get a fresh workspace ready for our new workflow.
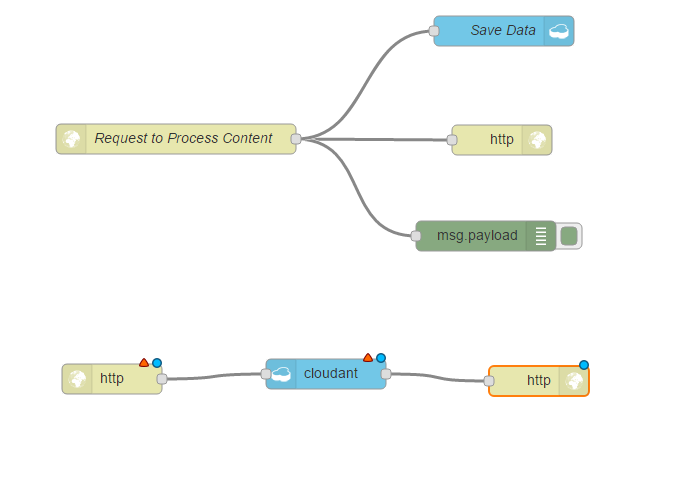
The first node we want to add is an input node to capture data from our client application. We will use the HTTP input node to create an API however, you could use some of the other inputs, such as the imbiot node, if you wanted to capture data from a device or sensor.
To get started, click and drag the HTTP input node;
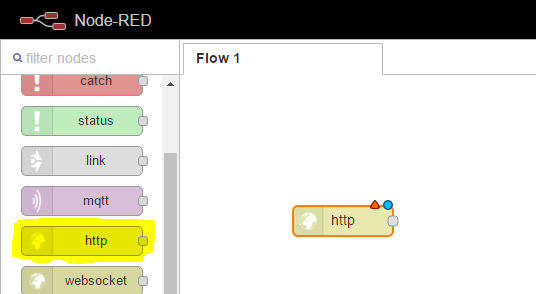
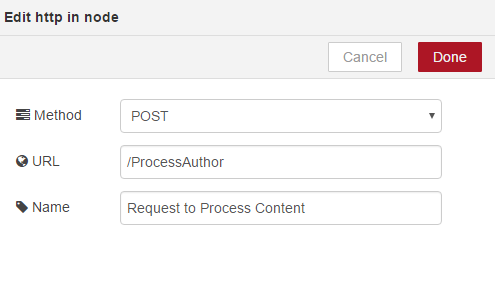
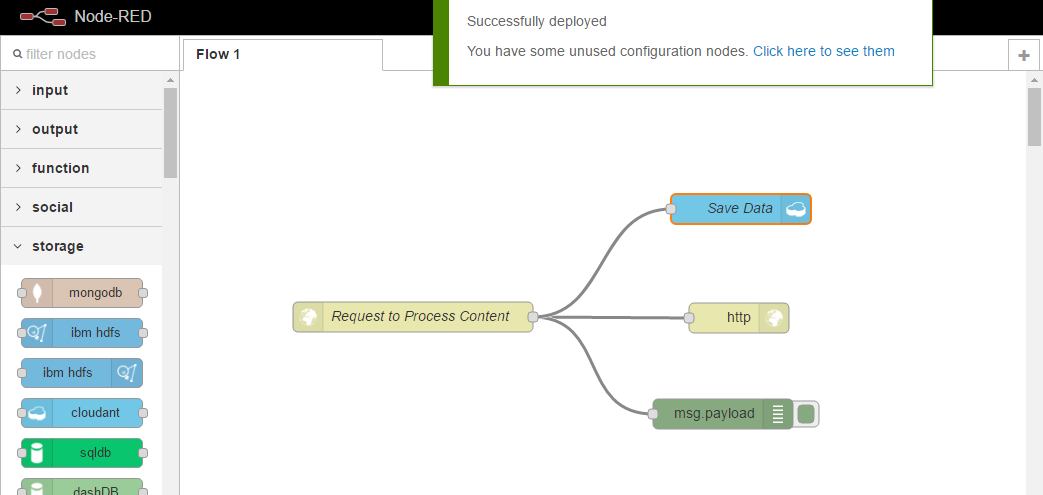
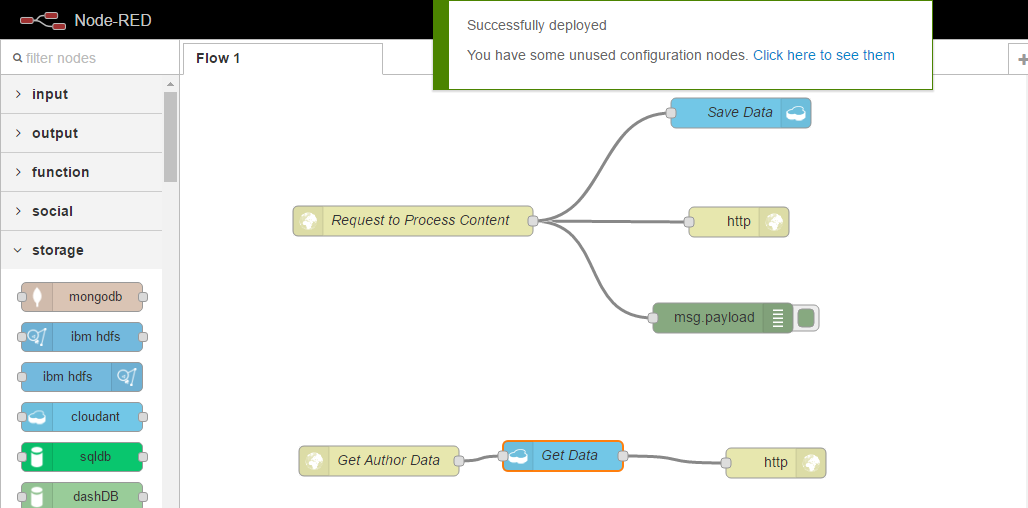
You can see it requires some configuration so we will double click and provide a URL. Process Author, this will allow us to capture the author data from our Node.js application. The data will be in the form of a post request and we will name our node Request to Process Content;
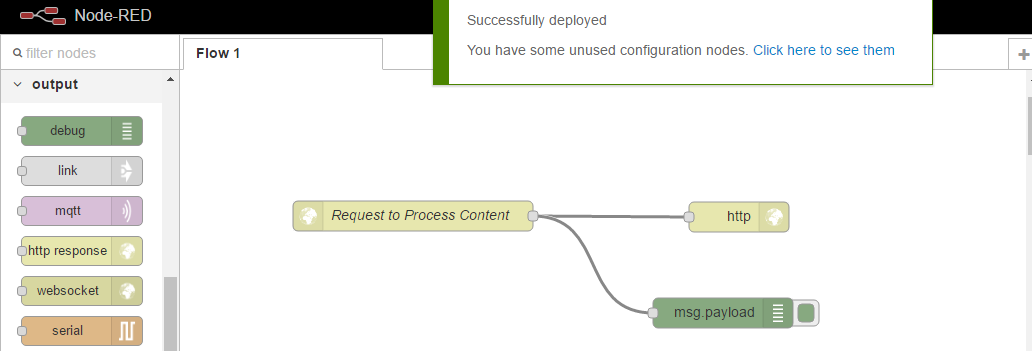
To complete the HTTP request, we will want to add the HTTP response output node. When using the HTTPN node, you will always want to complete the request in this way. Finally, we will link the two nodes together. We will also add the debug node under the output and also link this to the HTTPN. The debug node is very good for getting output messages on the data that’s flowing through your workflows. Finally, we can click Deploy;
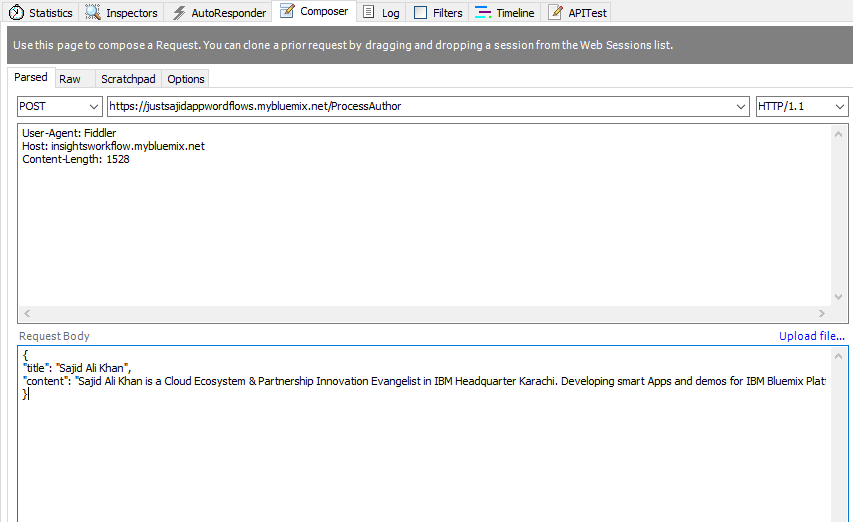
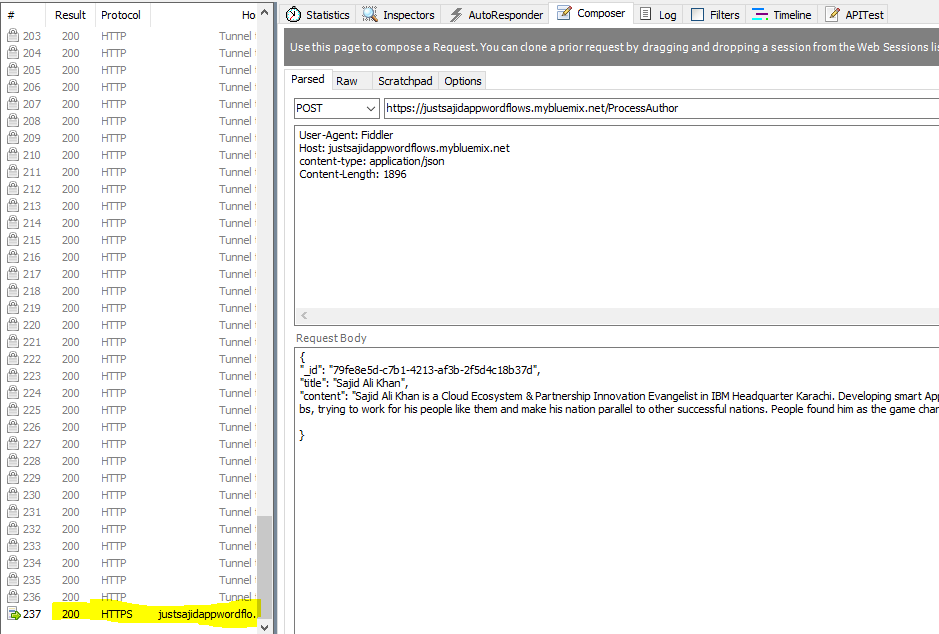
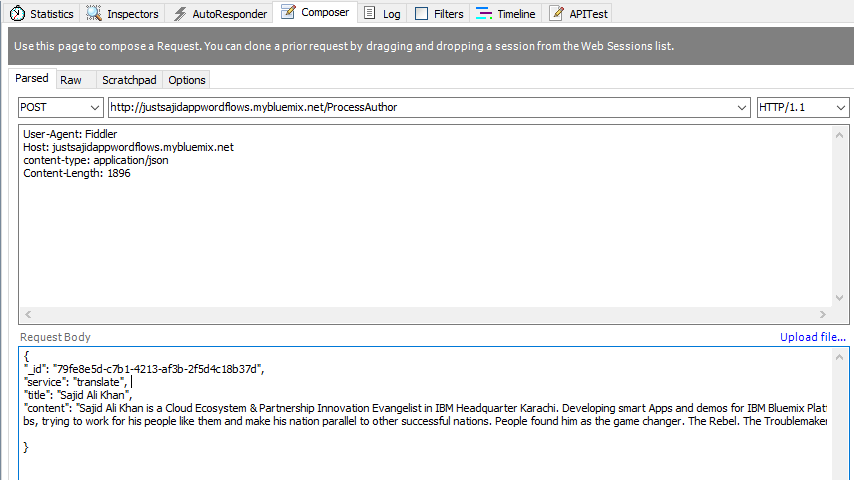
We are ready to test our workflow and to do this, we will use the free HTTP debugging tool, Fiddler. From Fiddler, we can compose an HTTP request to simulate our Node.js application, pushing data into our workflow. We will create a post request and URL will be comprised of our host name, justsajidappwordflows.mybluemix.net. And the URL be specified in our HTTP input node, process author;
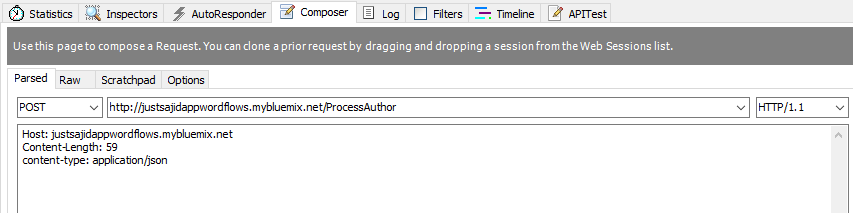
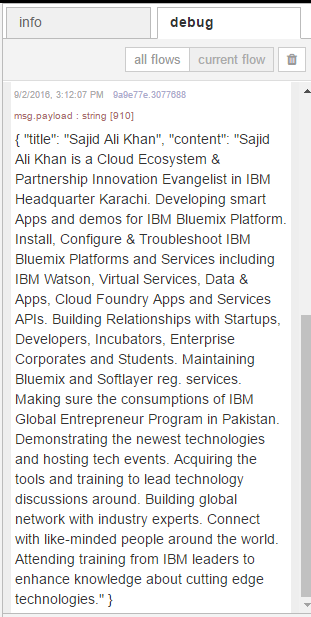
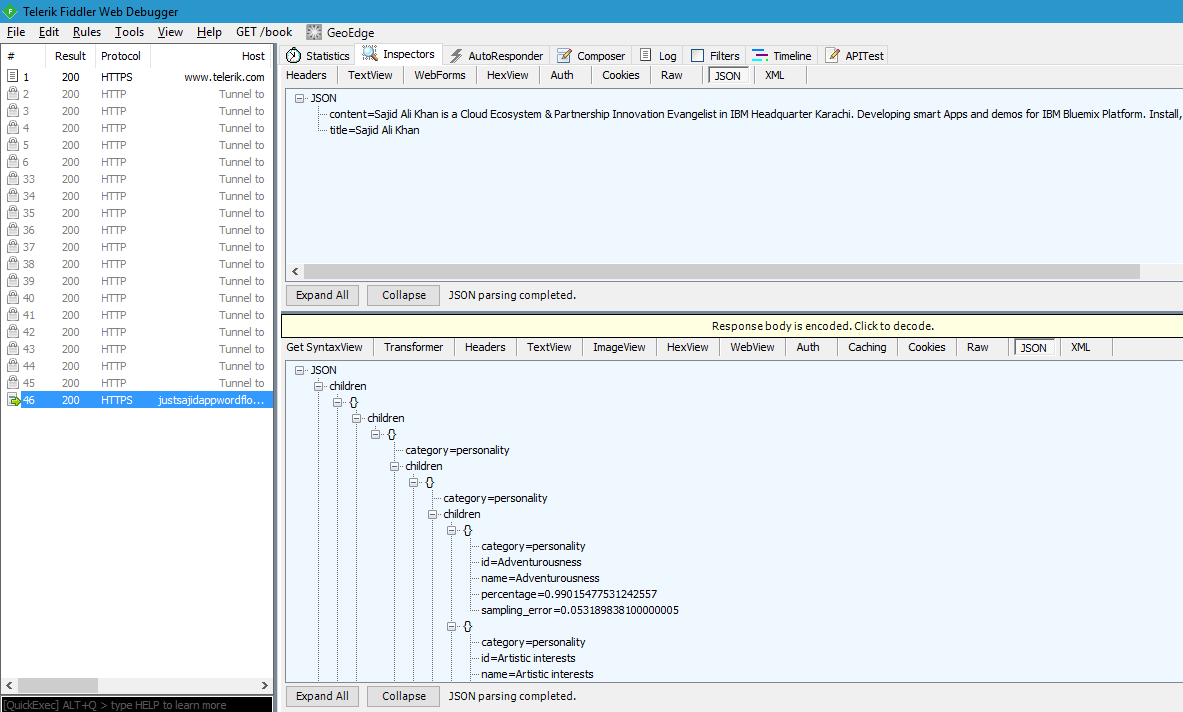
We will want to set a header for the content type to be application JSON, and a request body, which will be some JSON data. We will provide a title, and some content;
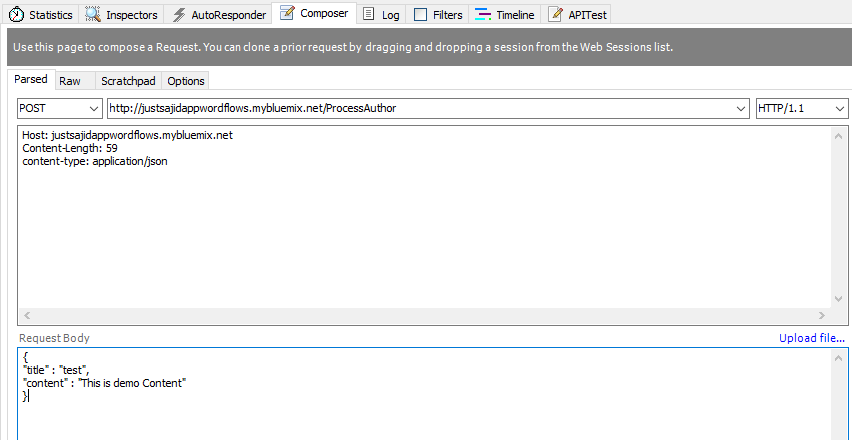
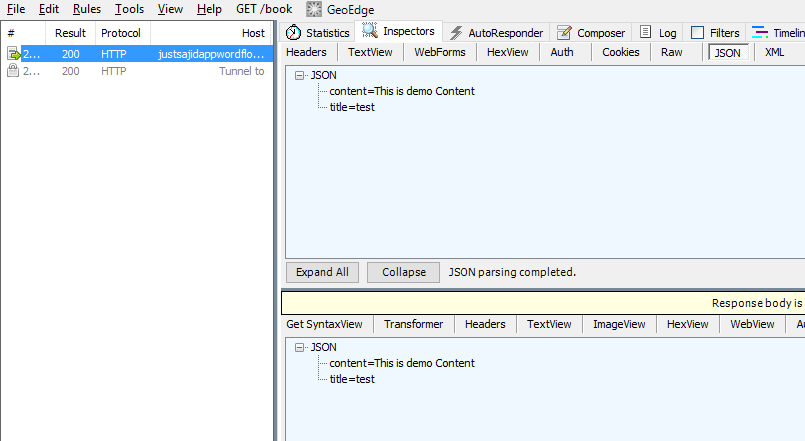
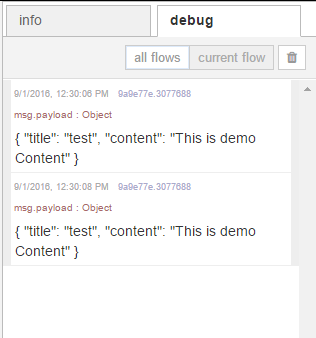
Finally, to test our workflow, we can click Execute. You can see we have had a 200 response, which means the request was successful and if we view the request, you can see the data has been returned to us;
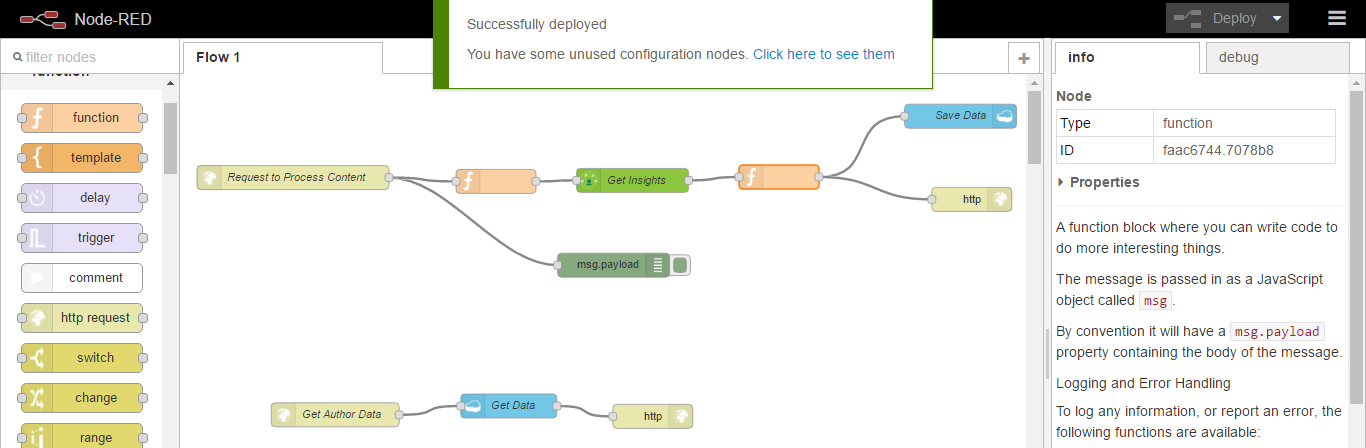
If we return to our workflow, this is because we have simply taken a message that was input from the request and returned it directly back to the client. If we have a look under the Debug tab, you will also see the message that was parsed in was output, this is a very simple workflow. So what we will do now is add a step to persist the data that’s posted to our API to a database. To do this, navigate to the storage nodes. From here, we want to use the cloudant out node, which will allow us to store information into the Cloudant database. We can click, and drag the node into our workspace. Next, we want to link our HTTP input node to the cloudant node. You can see it also requires some configuration. We can select the service and we will use the Cloudant database that was provisioned when we provisioned the starter and we will provide a database name. Insightsdata, and make sure it’s all lowecase. Finally, we want to leave the operation as insert and only store the msg.payload object. Finally, we can give it a name. Save Data, and Okay, and you can see all nodes are now configured correctly and we can click to deploy;
If we return to Fiddler, we can run our request again and this time, it should be stored to Cloudant. We can simply just click Execute again and you can see we had a 200 response again, which means it was successful, and within our debug, we can see the data has been output. To check if our data has been saved, we could navigate to our Bluemix dashboard, find the Cloudant service, and interrogate the data from there;
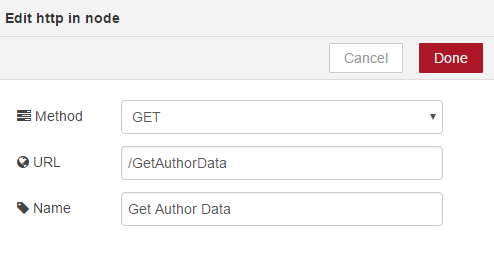
However, we will create a simple API to return all of the data stored in Cloudant. To do this, we need three nodes. We need another HTTP input node, an HTTP response, and the cloudant in node, under the storage tab. The cloudant in node allows us to search and retrieve data from the Cloudant database. We can connect these nodes and as you can see, the HTTP input node and cloudant both need configuration;
This time, we’re going to use get as a get request, and our URL will be GetAuthorData, GetAuthorData, okay;
Next, we will configure Cloudant. Again, we will use the default service, our database, insightdata, and we will just return all documents for this part of the course. We will name our node Get Data;
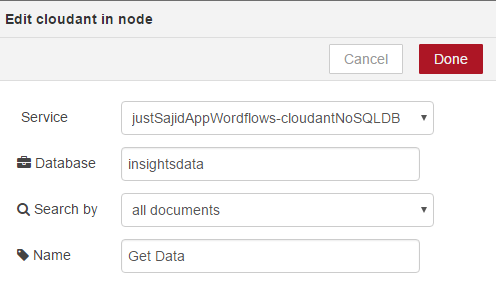
And you can see all nodes are now configured correctly.
We can run Fiddler again, and this time we’re going to craft a get request using the composer. So this time we will leave it as a get and we will use our host name plus the GetAuthorData URL that we specified on our HTTP input node;
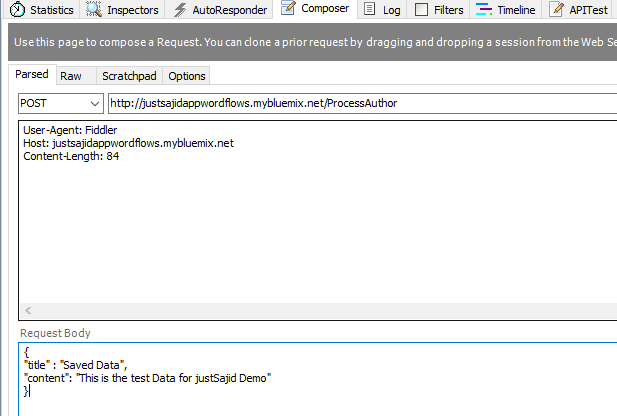
If we click Execute, you can see we have a 200 response and if we double click, we can see our JSON content has been returned. If we return back to our browser, we can also open a new tab and paste the URL into our browser and we will see the content has also been returned. You can see Cloudant has appended an ID for this new piece of data. If we return to Fiddler again, and this time, we will compose another post request, ProcessAuthor, we will send some JSON data and this time, we will send title Saved Data with some content. This is the test data. If we now click Execute, again, we can see our 200 response and if we return to our browser, we can now see we have two rows of data being returned from our Cloudant database. And we can close this tab.
We now have a basic API to capture data, save it to a database, and make it available again via an HTTP request.
Add Watson Personality Insights
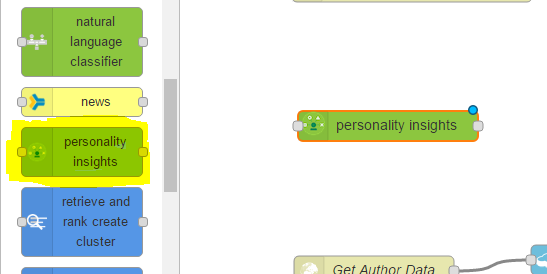
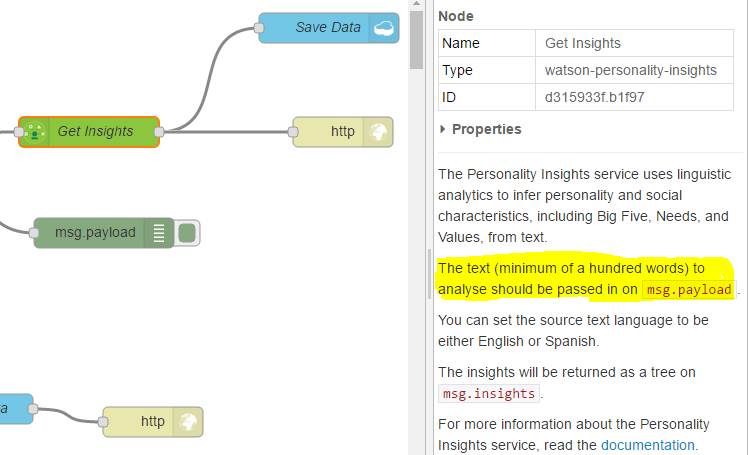
The next step will be to add some intelligence to our workflows and we can do this using the Watson services. Under the IBM_Watson nodes, at the bottom of the node list, we have all of the Watson nodes and we want to select personality insights. Again, we can click and drag it onto our workspace;
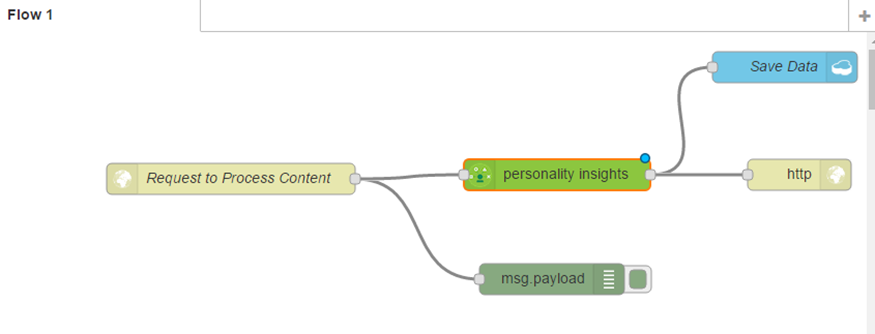
This time, we want to delete the connectors between the cloudant node and the HTTP response node so that we can add our personality insights node. We will connect up our HTTP input node to the personality insights and the personality insights will output to our Save Data and our HTTP response;
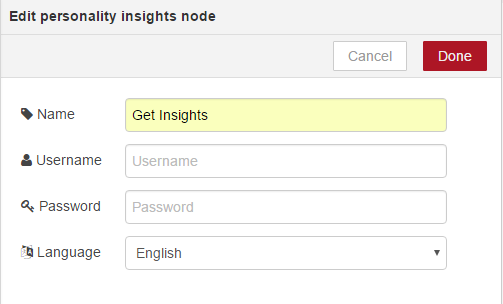
Now, if we double click on personality insights, you can see a username and password are required. We need to provision the personality insight service and make it available for NodeRed before we can deploy this workflow. We will give it a name, Get Insights, and click Okay;
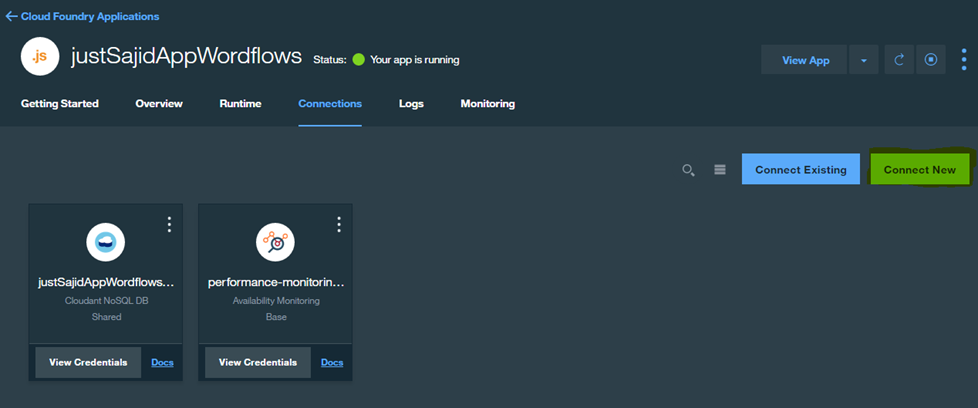
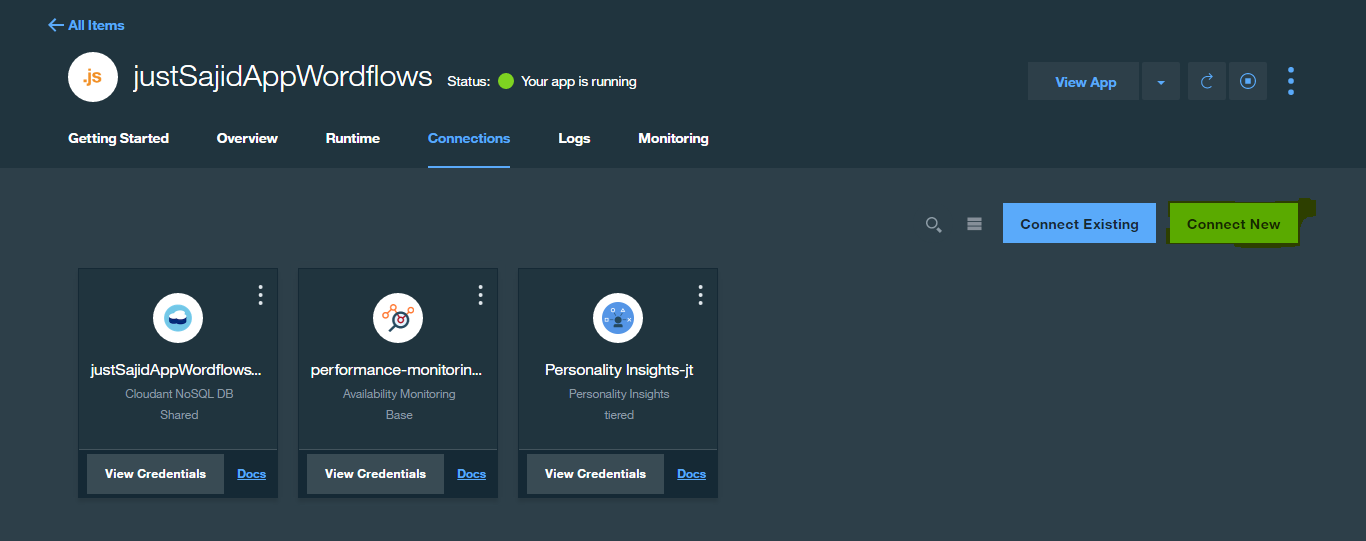
Now, let’s go on pervasing the service and get the credentials. To do this, return to your justSajidAppWordflows dashboard and from go to Connections Tab, from here simply select Connect New;
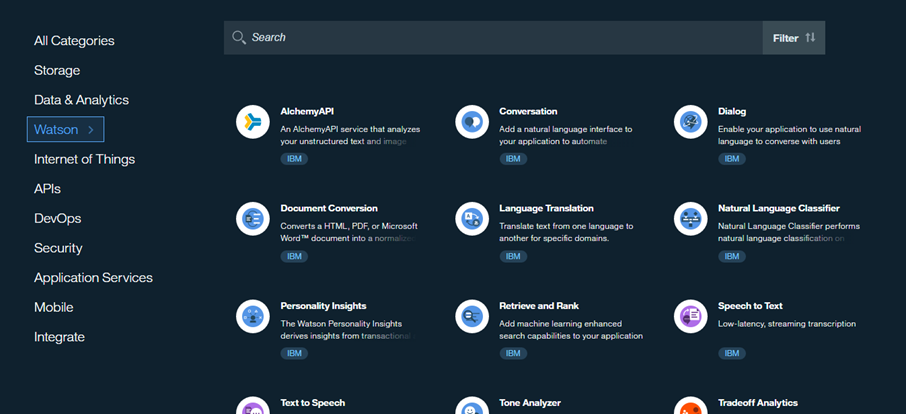
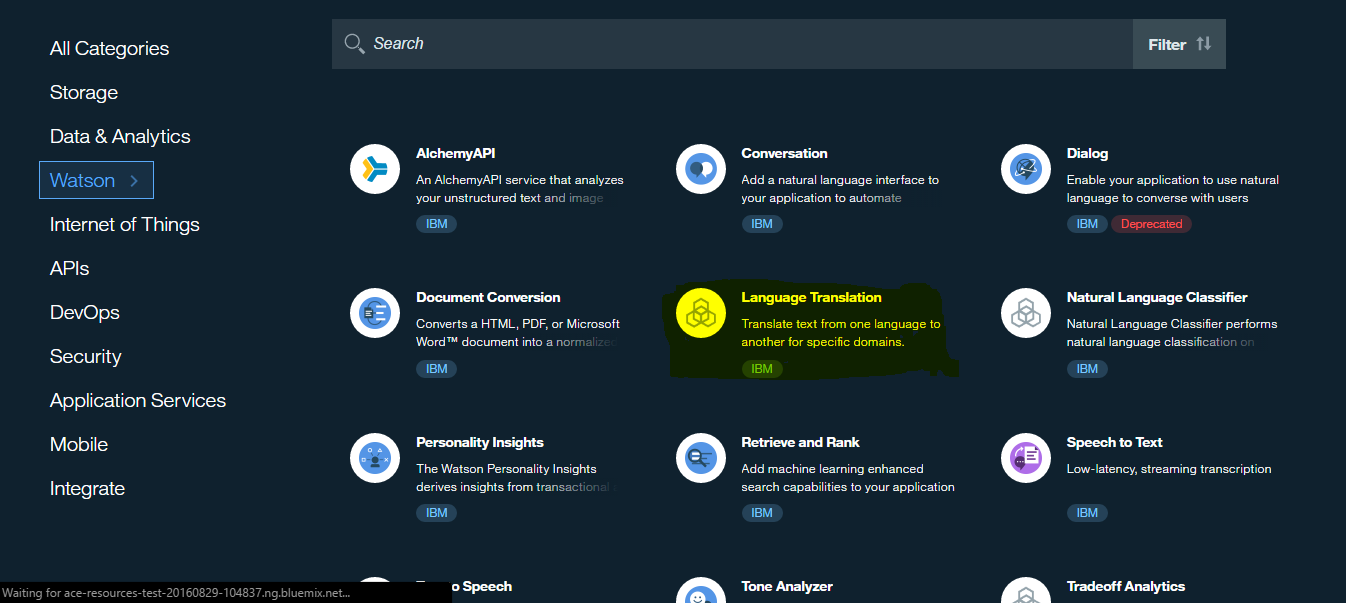
This will allow us to browse the catalog. Now from All Categories, go to Watson to select a service to make available within our NodeRed workflows;
From the catalog, we can select the Personality Insight service, we could leave the service name as is, and click Create;
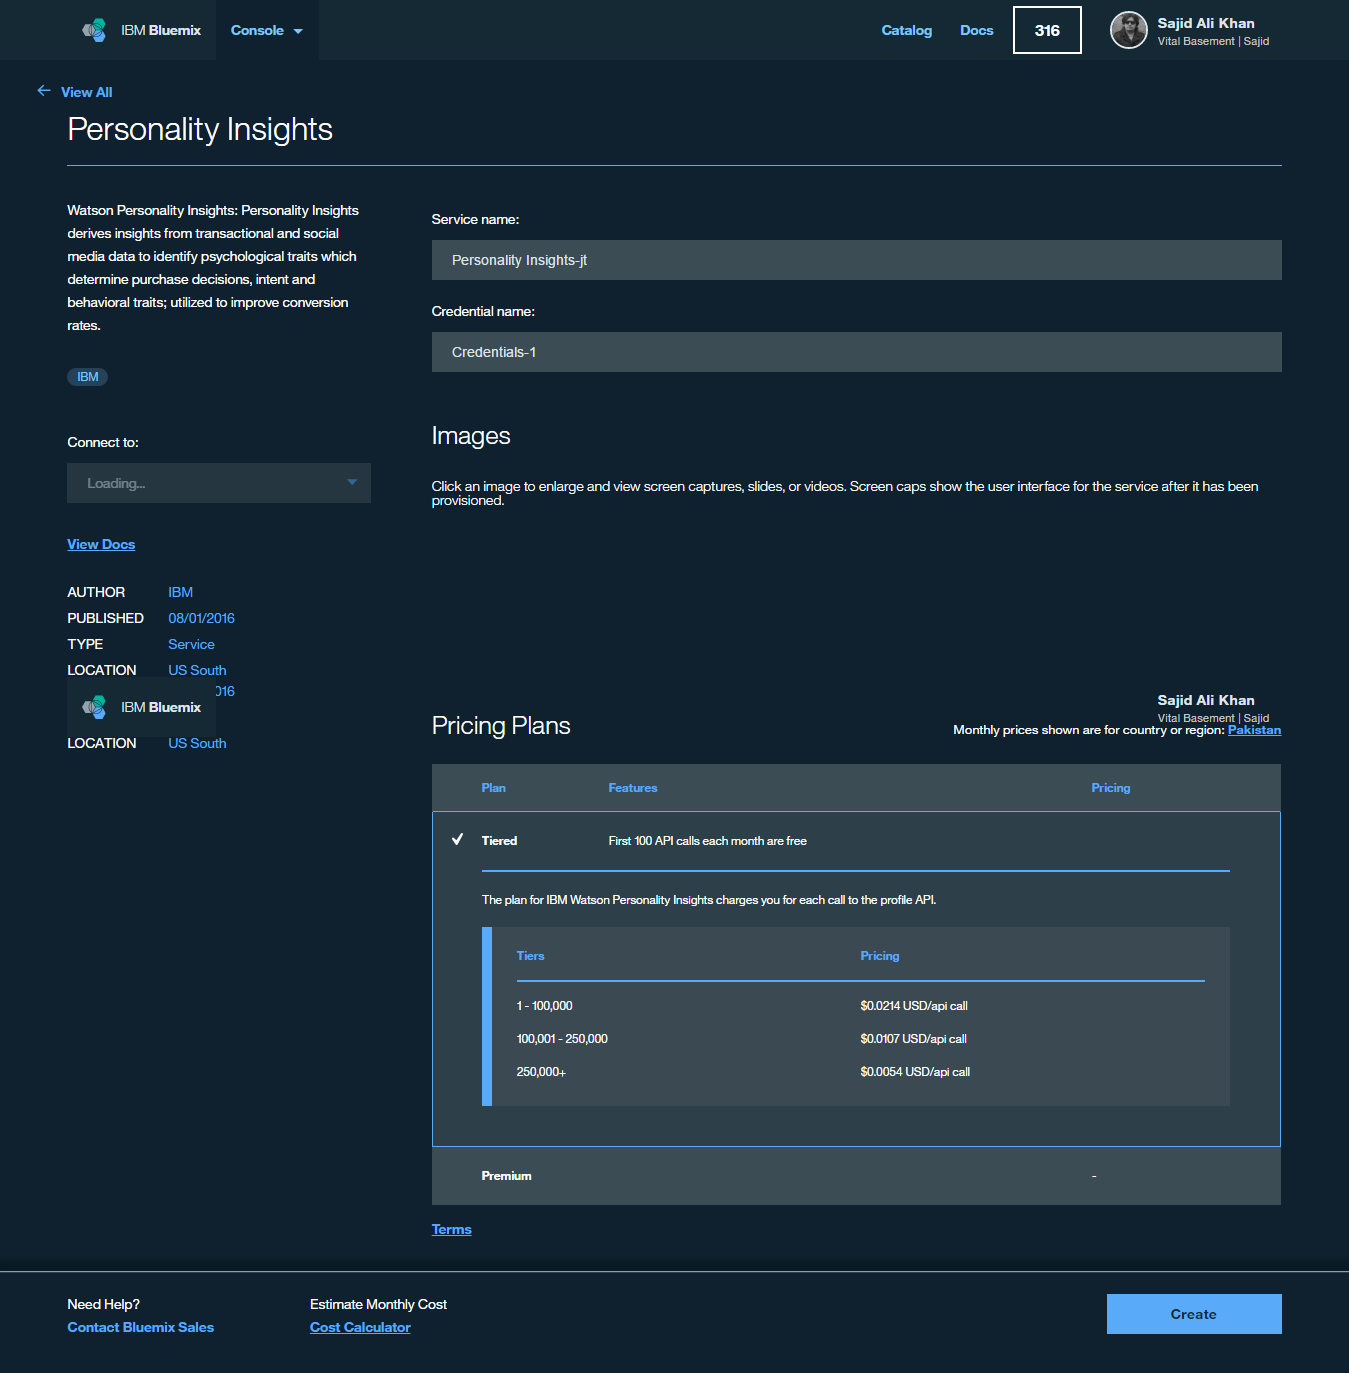
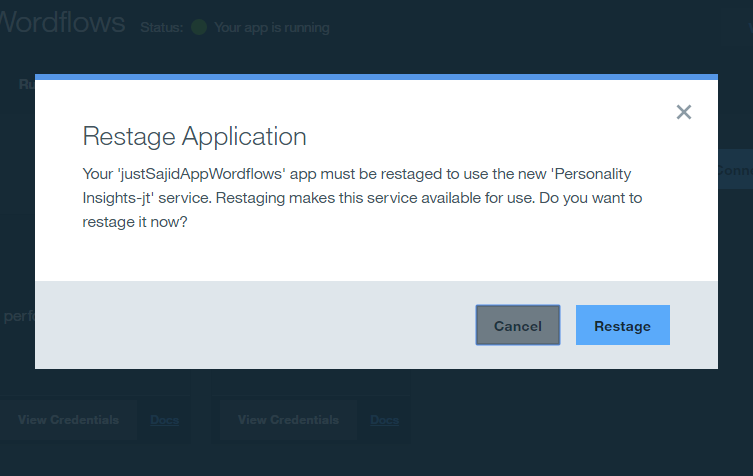
This will create the service and bind it to your NodeRed application. We will be prompted to restage our application. This is required to make the service available within our workflows. We can click Restage;
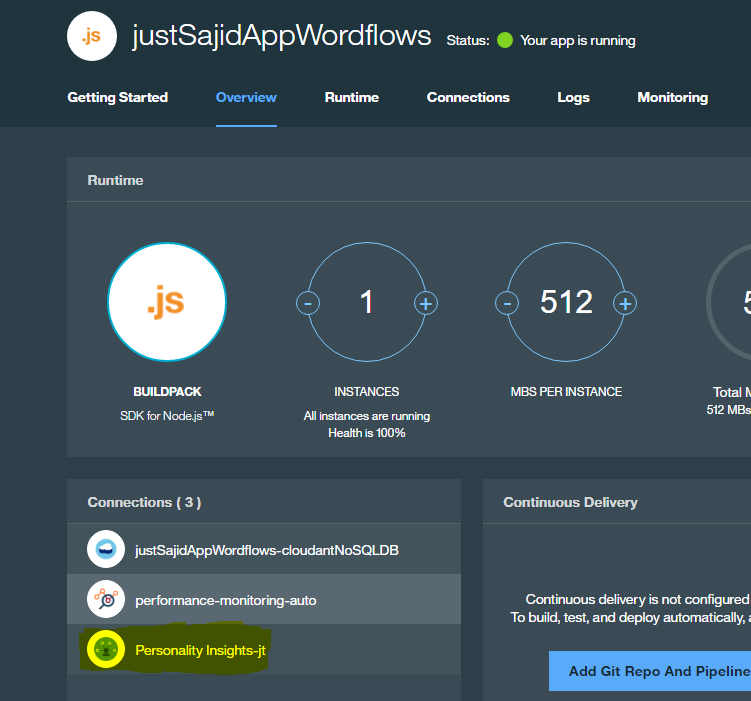
Now that NodeRed is up and running again, we need to get the credentials from the Personality Insights service. To do this, return to the dashboard and at the bottom in the Connections section, you will see the number of Connections we have provisioned;
We want to click on the Personality Insights and this will take us to the service. From there, simply click on ‘Service Credential’ Tab;
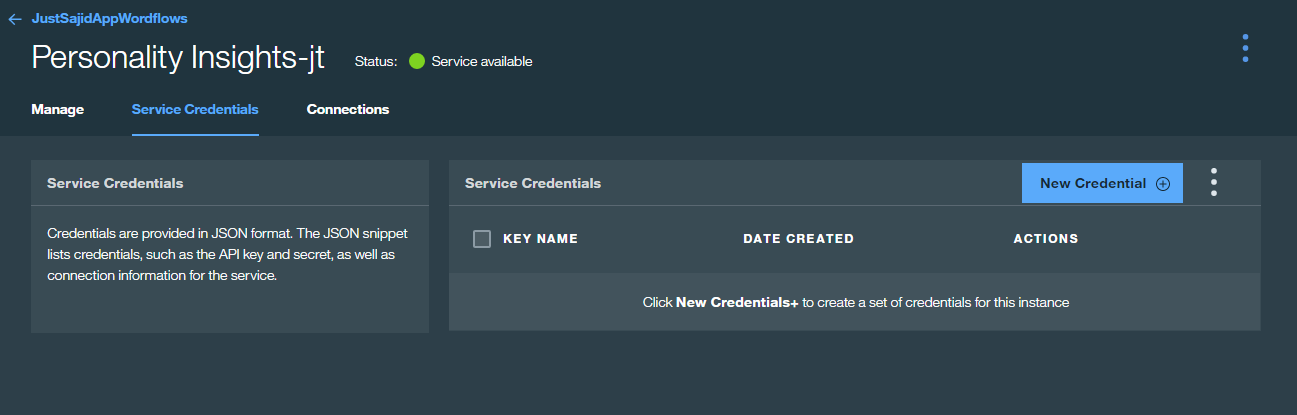
You can see we currently have no credentials configured. Click New Credential Button, you can give your credentials a name, and click Add;

If we now return to our workflows, and double click on our Get Insights node, we are no longer prompted for credentials. And this is because it has detected we have credentials configured. We can now click Okay and click Deploy;

We are now ready to test our workflow containing the Personality Insight service. Now let’s return to Fiddler and we can rerun our post request.
This time, we want to update our request body to include some real content. We are going to use my biography from the Pluralsight website. This is because Personality Insights will require a minimum of 100 words;
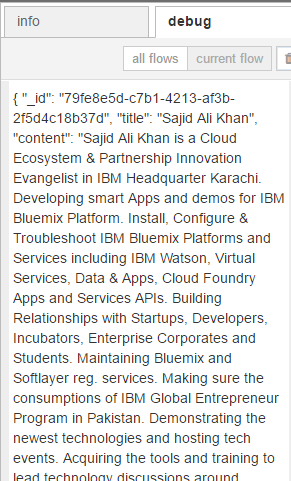
If we now click Execute, you would see we haven’t got a 200 response just yet. This may be because there was an issue in the workflow. If we return to our flow editor, you can see the payload has been output because we have our debug by putting the input request;
However, you can see there’s an error. If we click on Info and select the Get Insights tab, you can see under the documentation, service requires text to be parsed into the message payload;
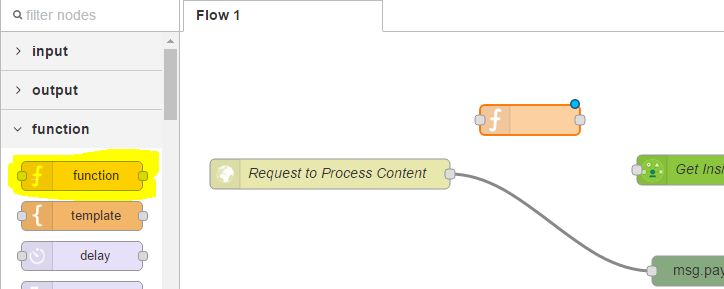
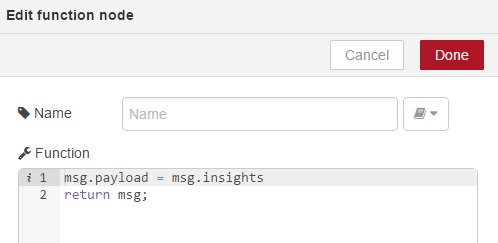
However, we are parsing a full JSON object, including our name and content. To make this work, we must add a function which strips out only the content required. From our nodes, if we drag on the function node;
And now double click, we can add the following script;
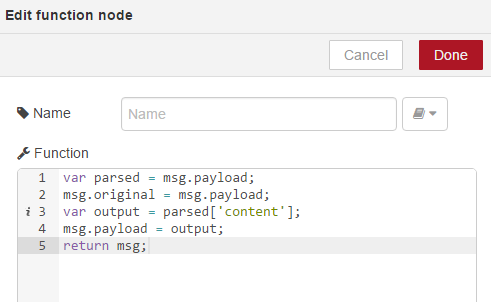
This will get the message payload and send it to the parsed variable. We will append the original message so that we can use it later in our workflow. We then create a variable called Output, which parses only the content and finally, we set the message payload to this content and return the message. We can now link this node up and you can see we’re finding it tight for room so we can use the plus and minus icons at the bottom to increase or decrease the size of our workspace and I can just give myself a bit more room here.
Okay, if we select on Get Insights again, we will also notice the insights data will be returned on the msg.insights property of the message. For this part of the course, what we will do is we will just modify our payload data to be returned to our HTTP response to be the insights data. We will modify this later on and build up the entire message. But for now, to demonstrate this, we will add the following code;

We will set the message payload simply to be the msg.insights data returned from personality insights and return the message again;
We can link these up and we can see we need to deploy before we can test our workflow;
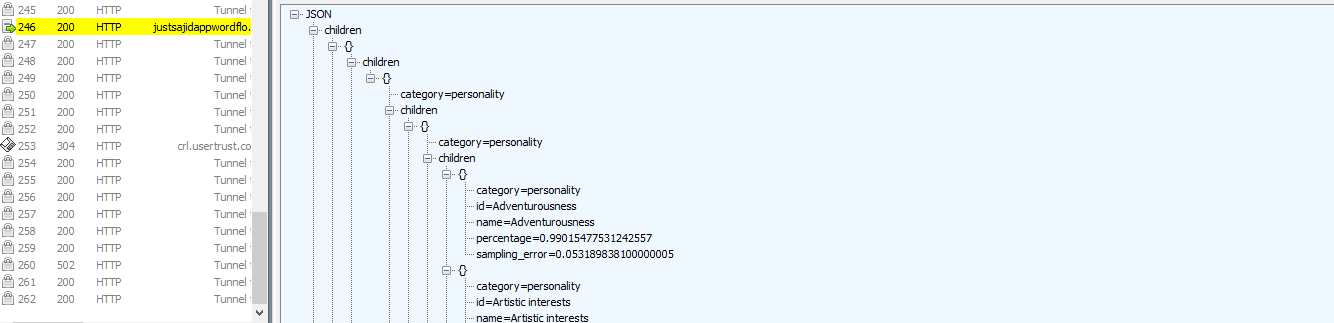
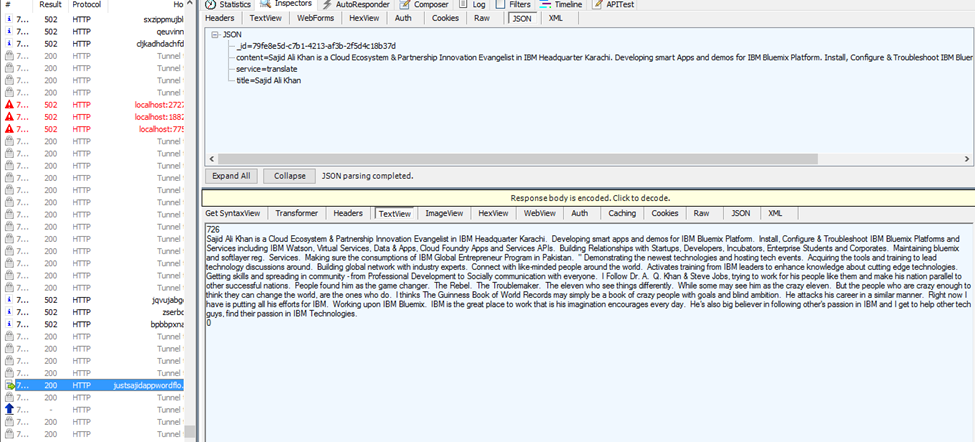
If we return to Fiddler again, and run the request one more time, we can see we now have a 200 response. If I double click on this request, you can see we have had some JSON returned, which includes the raw data from the personality insight analysis;
If we return to our flow editor, we can see the payload object however, we no longer have an error.
So now, we have parsed in a request, including my biography data, we have trimmed out only the content required for the personality insight service, parsed it to the service, and then returned only the personality insights service data to the HTTP response and we can see the service is actually analyzing the content and returning it. Now that we have our personality insight service, added to our workflow, we want to make a few changes to make the data ready for consuming within our Node.js application. We will add some summary information from the raw personality insights data. To do this, we want to add another function. We will add this between the existing function and the Save Data and HTTP output;
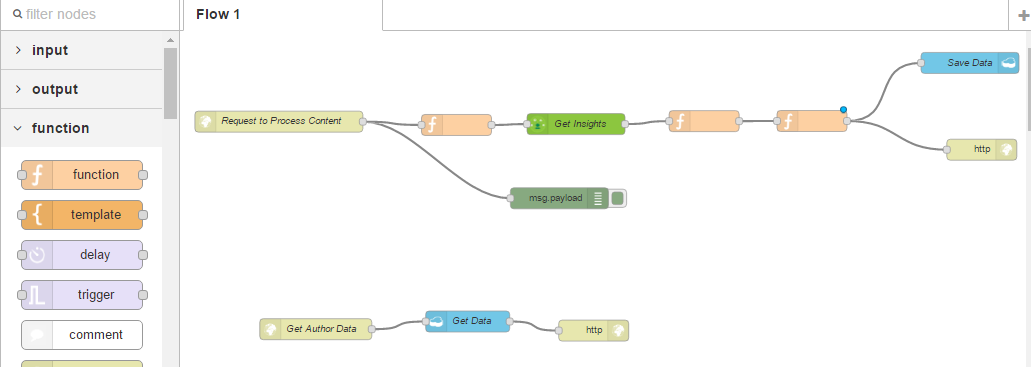
We will connect up our nodes, and this time within this function, we will add the following script;
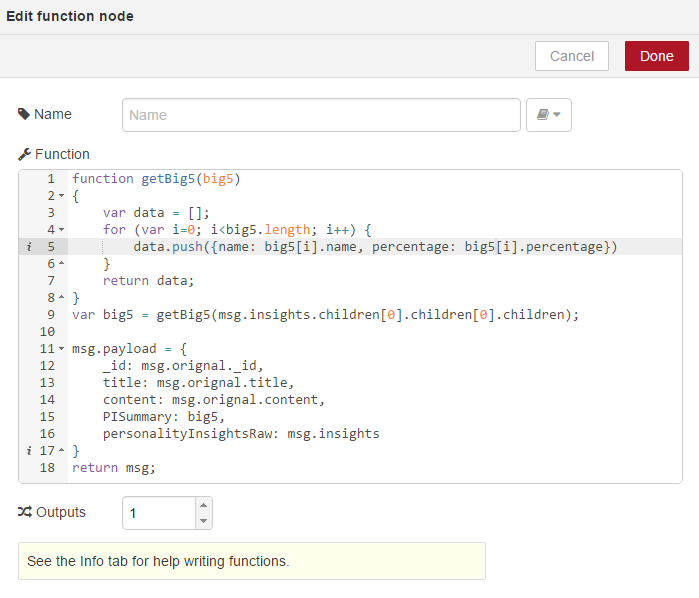
This script has a get big5 function, which innervates over the raw personality insights content and returns some high level percentages. We then build up our message payout again, using our content from the original message and if you remember in the first function, we assigned msg.original to the payload request from the start of the workflow and we’re also going to add a PISummary, which is our get big5 summary data and finally, we will append the raw msg.insights data from the personality insights service to personalityInsightsRaw. We can now see our payload building up very well. However, one thing you may notice is that we are also appending an ID from the original message. If you remember the JSON we posted from Fiddler, we didn’t have an ID. The reason we are now including an ID is as we build up our workflow, we need to have a consistent ID available to keep the context throughout the workflow. This means we will now need to parse an ID in from our original request. Cloudant uses GUIDs for its keys so we can simply generate a GUID form our Node.js application or from Fiddler and parse that along with our content.
If we click Okay and now deploy our application, we can run our request again from Fiddler. Only this time, we need to require an ID. To get a GUID, I will use an online tool. If you search for GUID generator, and the top result in Google should help you generate a GUID. I will copy that ID and we can now rerun our post request, this time, appending our ID properly. It will be _id plus the GUID we just created. Now, if we click Execute, we will see we have a 200 response;
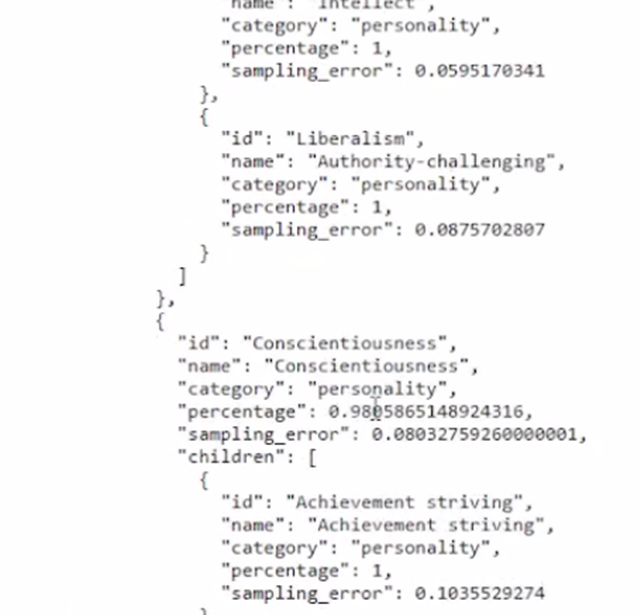
If we double click, we will see we’ve got our full message back, including our ID, the content we sent, the raw personality insights data, and the summary data we have also appended;
If we return back to our flow editor, we can see the payload object has come through and there are no errors;
We will now want to modify our Get Author API to allow us to filter based upon ID. To do this, within the cloudant node, change all documents to _id and click okay;
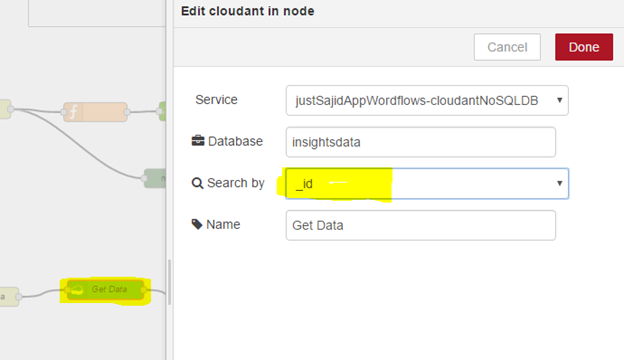
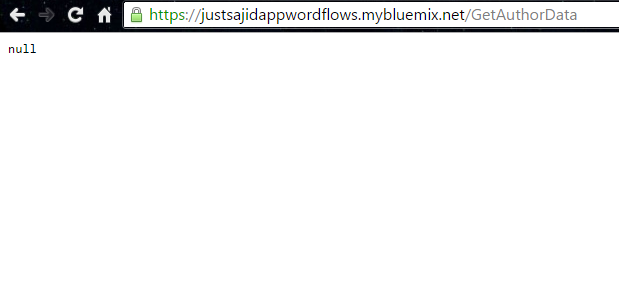
If we deploy this, and now, we view our Get Author data, we will see it’s returning null as opposed to the full list of author data;
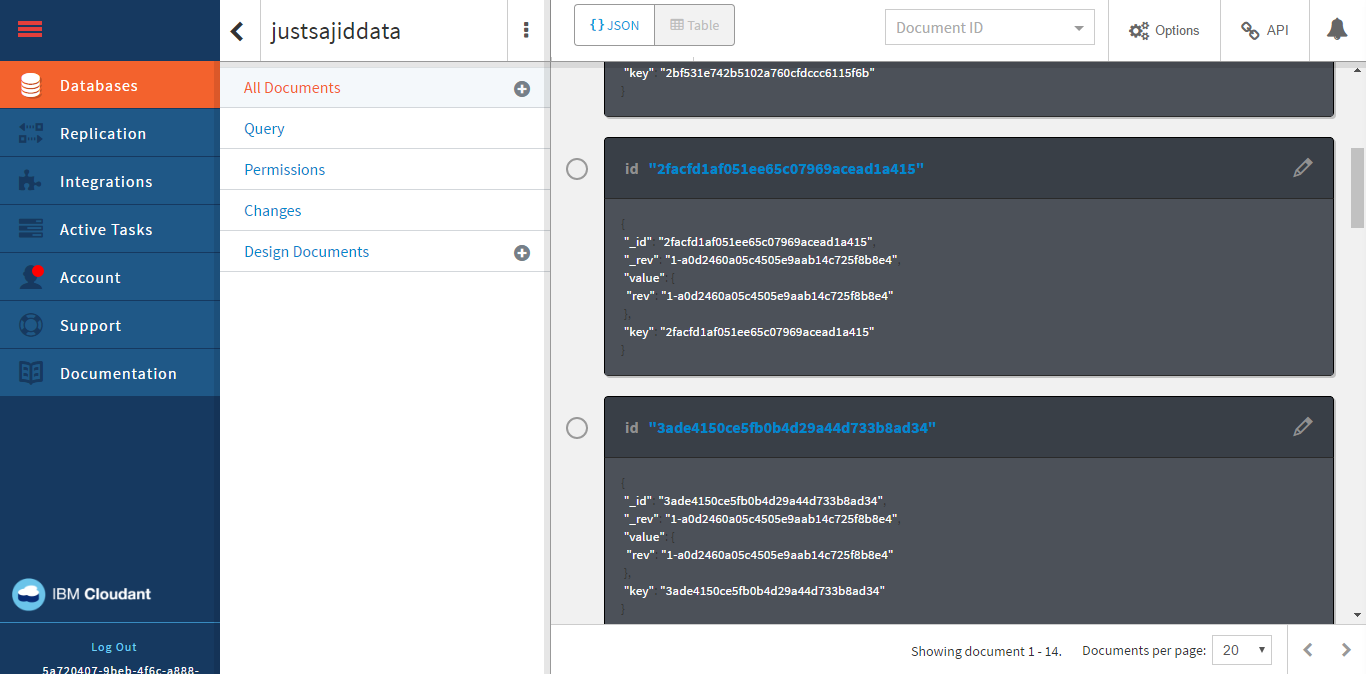
If we add ?_id and our GUID, this will allow us to filter by individual records. And you can see we now have the full message data coming back from our Cloudant database, including our personality insights and our summary data;
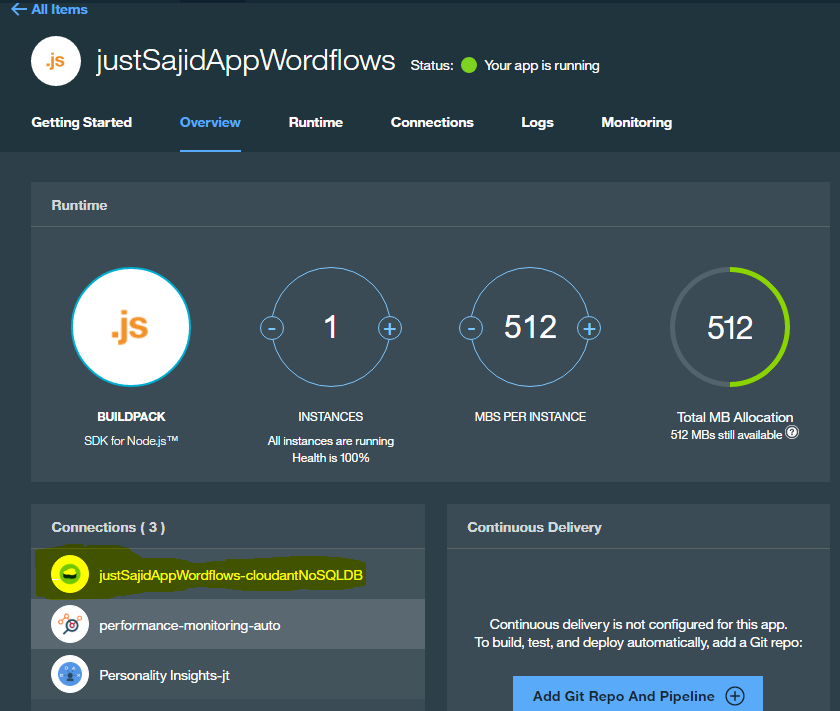
Another way to view the Cloudant data and indirect with the Cloudant database, is via the service itself. If we return to Bluemix, and from our Insights Workflows Overview page, we can see the services that are configured against this application. We can see we have our personality insights, monitoring and analytics, and also the Cloudant NoSQL database.
If I click on this tab, it will take me to the Overview page for the Cloudant database;
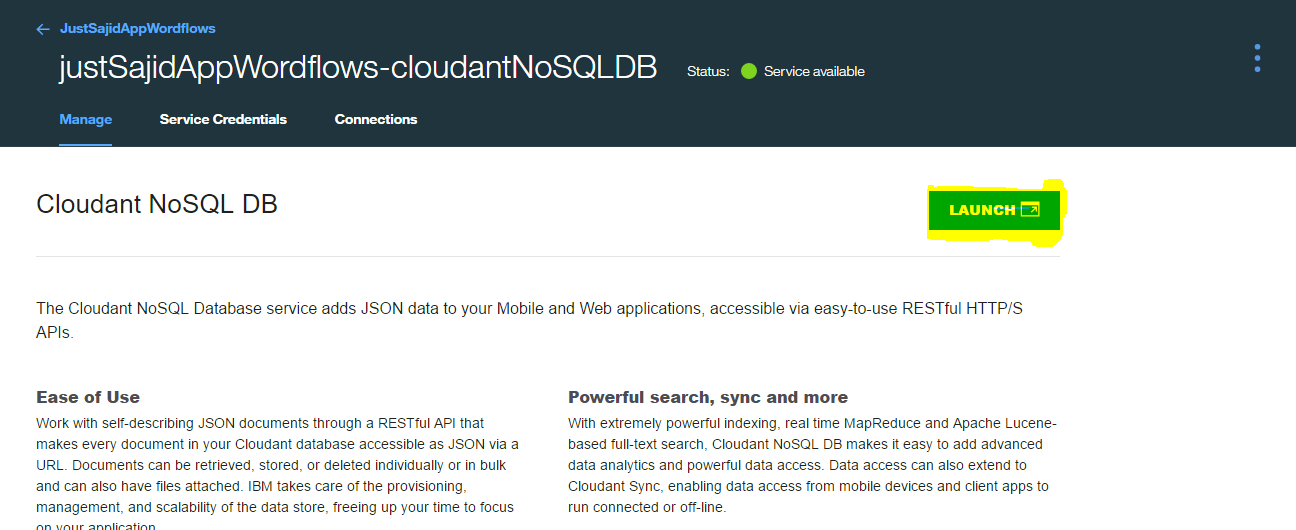
If I click Launch, it will launch the online tool for interacting with Cloudant;
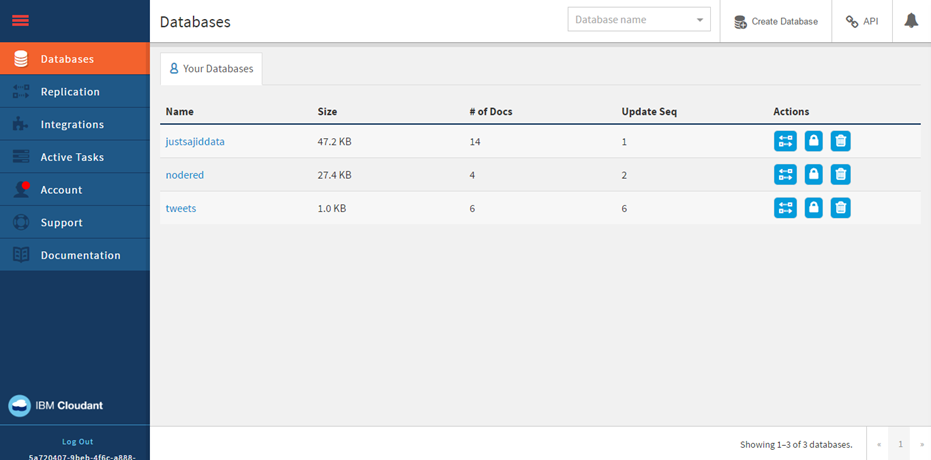
From here, you can interact with your databases, your data, add or remove rows, write queries;
And there are a whole range of other features within the Cloudant database. It’s just useful to know how you can access these.
And you can do the same for any of the other services that are configured, simply click on the tab and you can get options for configuration.
Add Watson Language Translation
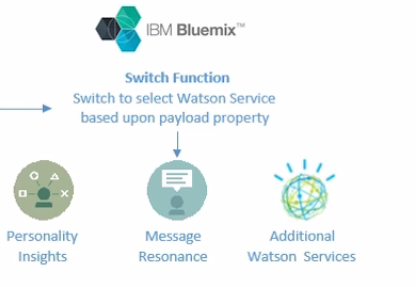
If we return to our NodeRed flow editor, we will now take a look at how we can expand our workflow to handle multiple Watson services. At the moment, a request will always push data through the personality insights. We may want to use additional services, such as Aclchemy API or even the translation service, which we will look at how we can implement into our workflow now.
To select different workflows based upon a property, you can use the switch function. You drag on the switch function and double click;
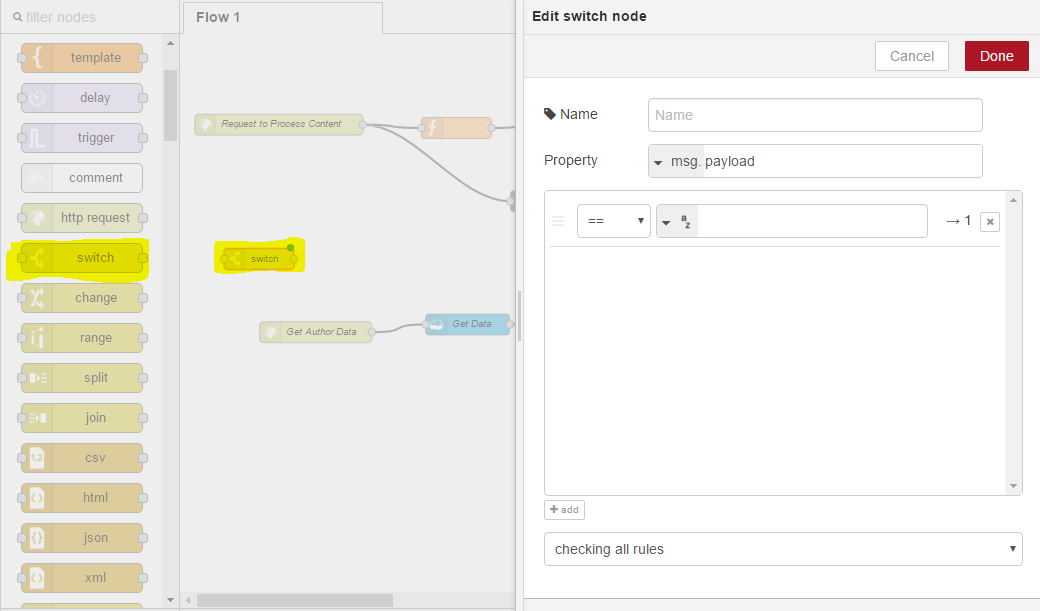
It will allow us to configure the switch. We will name it Select Watson and we will determine which workflow to take based upon the payload.service property and we can append this to our message that we send into the request. If the service property matches translate, we could select the translate service, we could have others such as the AlchemyAPI but for now, we will just use translate and if a service property isn’t parsed in or doesn’t match translate, we will use the otherwise option and always go through the personality insights workflow. We can modify this to stop after the first match, so as soon as it detects translate, it will go through that workflow. And finally, click Okay;
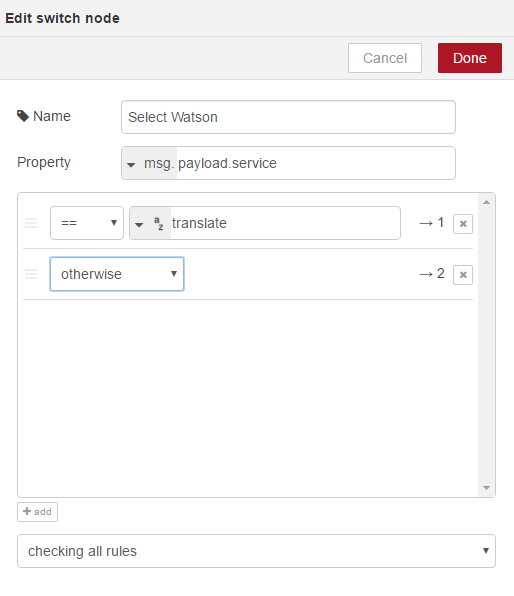
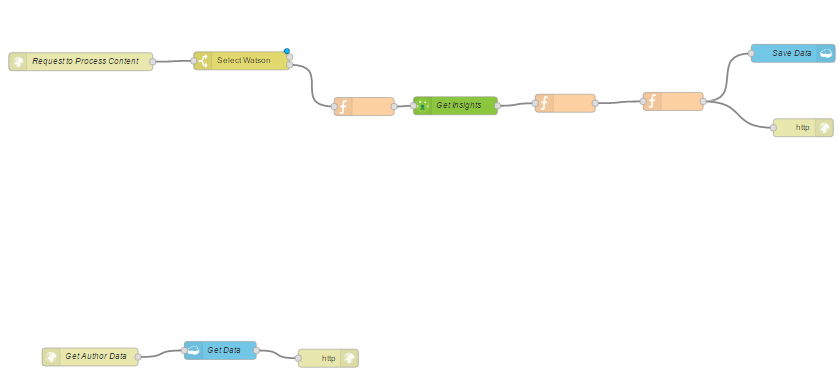
We will just move around our workflows a little. You can click and drag nodes to make some more space. And we will want to move all of these ones down and wire up our Select Watson node. You can see Select Watson now has two connectors. These will be in order of the rules that you have specified. So the first will be translate, the second will be otherwise, and depending on how many rules you have, you will have connectors. So the second will be otherwise so we will connect that to our personality insights workflow;
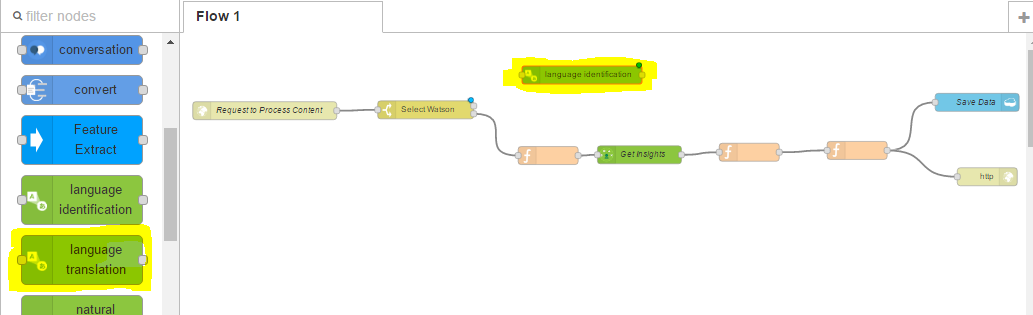
So now we want to use the language translation Watson service. We can find it from the nodes, click, and drag into our workspace;
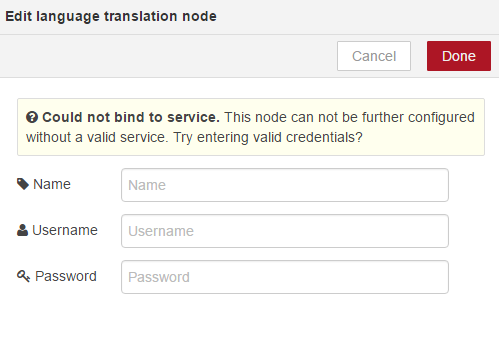
To configure this, double click again and you can see we are being prompted for some credentials, as its saying This node cannot be further configured without a valid service. Try entering valid credentials;
(well as being able to specify a domain and source and target languages for translation.)
To get these username and password details, we must first provision the service. We will do that now. If we return to our Bluemix dashboard, and under our Connections Tab, simply add New Connection;
Now similarly go to Watson Services and select Language Translation Services;
If we click on this, similar to when we provisioned the personality insights, we have the option to browse the catalog. This time, we will select Machine Translation. We can leave the details as they are, and click Create;
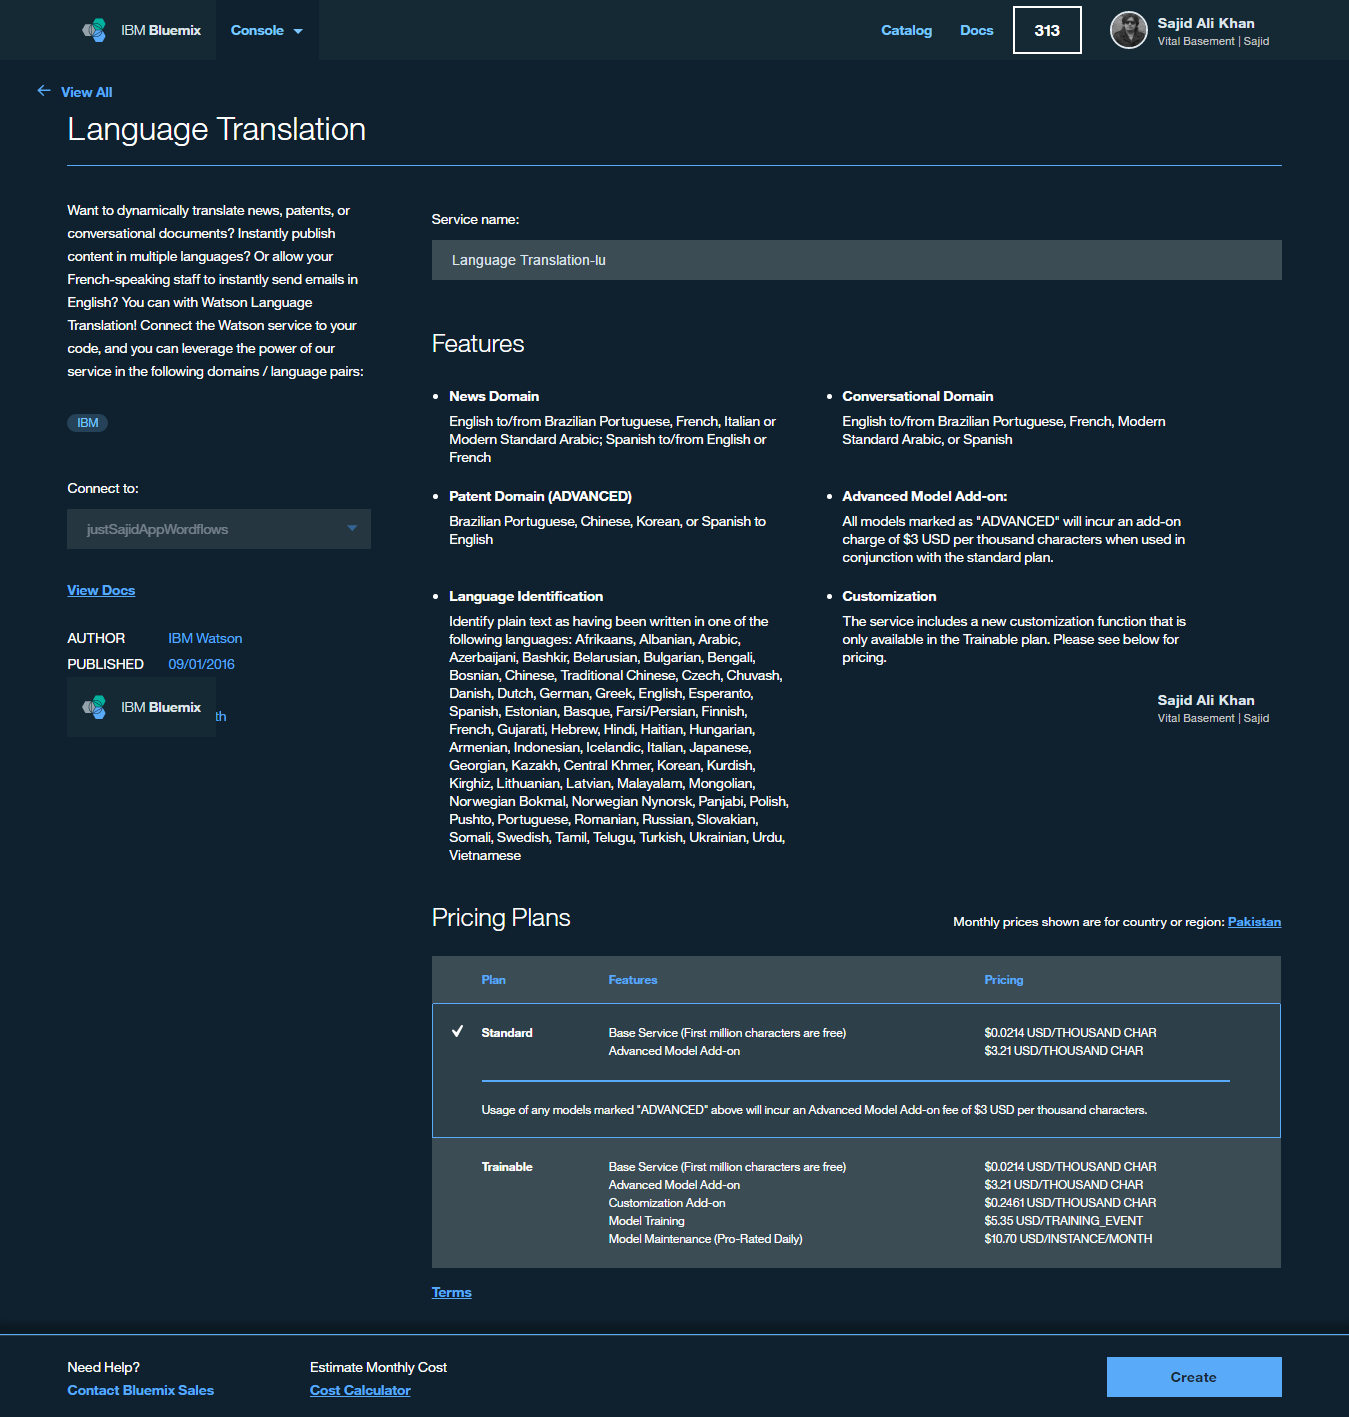
This will provision the service and bind it to our node workflow. We can restage, our application is now running again, so we can return to our flow editor. If we now double click on language translation, you will see we are no longer prompted for credentials. Our flow editor has automatically detected the credentials from the language translation service. We can just give it a name. And we will leave the default options as they are. Our content will be translated from Spanish to English
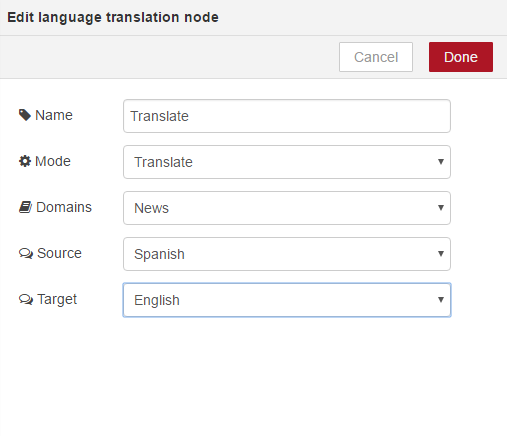
If we click Okay, now we want to wire up our connector from the first node to our translate service. if we look at the translate, however, you will see, similar to the personality insights, the text we translate should be the msg.payload and we are still parsing in the full message at this point so what we want to do is replicate this node, which parses the original payload content and strips out only the content we want to use within the service. We can either copy this text and create a new function or even easier, if we highlight the node we wish to copy, we can use Control C on our keyboard to copy the node. If we click where we want to paste, we can then use our Control V to paste the node and it saves us having to drag on the node and reconfigure. We can now link that up and I’m actually going to do the same with the Save Data and HTTP nodes. I can click with my mouse and highlight the nodes I wish to copy. Again, Control C, two nodes have been copied. If I click on the workspace and paste, I can now link these up. So our workflow has now been modified to process a request;
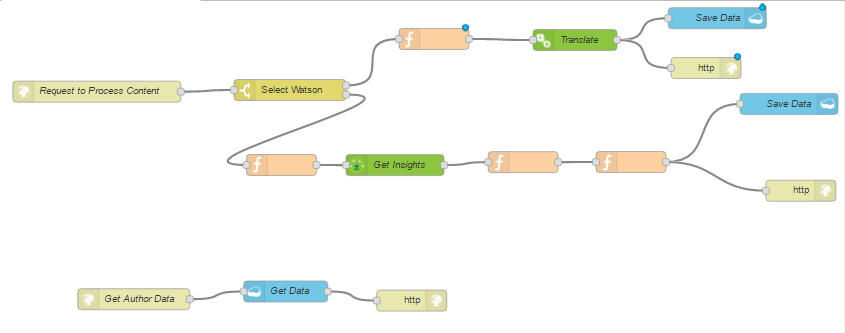
If the request has a payload.service property and that equals translate, it will go through the first workflow, otherwise if it has no payload.service or doesn’t match any of the rules, we will then go through the second workflow, which is our personality insights workflow. You can now see a lot of nodes need deployed so we can click Deploy.
If I return to Fiddler, and this time, I’m going to run the post request again, except I’m going to modify it to include the service property;
And we will use translate, Execute. We can see we have a 200 respsonse that’s come back and if we view, double click to view the request, you will see the response is the translated biography data
You can now see we have updated our workflows to handle some conditional logic based upon an attribute we can parse into the message. We have added increased flexibility to our workflow. Rather than creating individual workflows based upon the service we want to use, we can simply add a switch, parse through the attribute in our message and call the desired service. We are now ready to take a look at starting our Node.js application using the two workflows that already exist. The end points will be insights.mybluemix.net/ProcessAuthor and /GetAuthorData. These end points will be important when we are building our Node.js application, as they are the entry points to our workflows.
- Conclusion
So we had a look at the flexibility NodeRed can offer and how we can build workflows and work together services without the need for any plumbing code. Simply drag on your node. It could be a database for persistence or enhancing our apps with cognitive computing, using the Watson services. We can easily API enable our apps using the HTTP nodes to create end points that can be consumed by other planned apps or services. This could be mobile, or premise systems, or other services running on Bluemix. We see how this flexibility and ability to rapidly build workflows really lends itself to prototyping or experimenting with services or ideas without huge buy-in or commitment. I hope this has helped spark some creative ideas on how we can leverage the Bluemix offering using NodeRed as a way to tie your application together.
* For Discussion upon any service or query, feel free to ping me @ Sajid.Ali.Khan@pk.ibm.com.